Using templates from boat plans to make frames
 While I might be a geek who actually likes pouring over the numbers to loft out a boat for my boat building project, it is not something that I would necessarily recommend for everyone. For some reason, many people don't think they have fulfilled the requirements for a boat building project unless they start with pencil and paper. That would be like saying you didn't build a house if you didn't first accomplish all of the architectural drawings yourself. Sounds silly when you think of it like that. So why not give yourself a break and focus on building a boat?
So many boat building projects get stopped at the early stage of making frames and there is no reason for it. When done the right way it could not be simpler. When done wrong, I can think of nothing more harmful to the project. Most things in a boat project can be fixed, manipulated or otherwise changed if need be. However, if you are building a framed boat, the setup of the jig and frames is tantamount to pouring the foundation for a house. If it isn't right, the rest of the project will be painful.
 First, let's start by ending the argument of whether or not purchasing full size patterns with your boat plans is worth the money. We get to talk to all kinds of people from all over the world and in many walks of life. We constantly hear from people (typically men) that they have been carpenters or home builders or cabinet makers etc.... their entire adult life and can't imagine they should spend the extra $50 or $100 for full size templates. Of the ones that we hear this from I would say that about 50% of them come back and end up getting the patterns after purchasing the boat plans. I often wonder how many of the remainder of them don't come back for the patterns out of some misguided sense of pride. This is a particularly foolish attitude when you consider that about the only thing building a house and building a boat have in common is there is wood involved. When you consider the time, effort and money you are about to spend on building a boat, trying to save a few bucks on patterns seems a bit silly doesn't it. That is not to say that a good set of plans do not give you enough information to make your own full size patterns, because they certainly should. It simply means that unless you really know what you are doing, buy the patterns with your boat plans.
OK, lets get started. For this article we will be talking about hard chined boats. We'll cover round bottom boats in future articles.
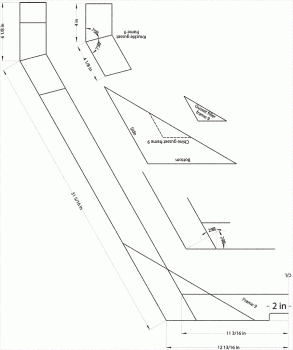
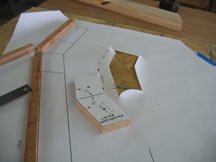
 The picture on the left is typical of the kind of information that you will receive when you purchase patterns. there may be more or less detail and some of the items may be generic to all of the frames so there will be some variation. The basic the basic information that will be on the plans and patters is the measurements for all joints, as well as angles for joints. The pattern to the left also includes templates for the gussets and gusset fillers as this particular boat has specific requirements for these items. The boat being used for our discussion is an 18' Dory with a hard chine, flat bottom and knuckle.
The example here is a full size half pattern. this is fairly typical for larger boats as printing full patterns will spool off a lot of paper and it is not necessary for the making of the frames. I have never seen a boat which was not the same on both sides of the center line. I am sure there is one out there, I just have not seen it.
We need to start by making all of the components that we will need to build our frames. You should cut all of the components for all of the frames. Once you mix that epoxy, there will be no time to fire the saw back up. You will also be amazed at just how fast this process is going to go.
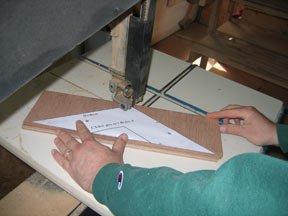
The components that will be cut from plywood, such as the gussets are taken directly from the patterns. Use a razor knife to cut away the template and get yourself some spray on adhesive such as carpet spray from 3M or crafters matting spray. Lightly spray the back of the template and put it on the plywood. In the example give here, we are cutting out gussets from 1/4" marine plywood. We know we will need 4 per frame so we have four appropriately sized pieces stacked and screwed together. If you are using a jig saw, there is no reason to start with smaller pieces, but if you are using a band saw, smaller pieces makes for easier work. It is pretty much the same procedure for the gusset fillers and with the exception that you will be working with the same material as the frames most likely.
 For the actual frame members, you are better served taking the numbers from the plans or patterns and cut them with a chop saw. Then simply lay them over the patterns to check your work. Remember that you are doubling the bottom member if you are working with half patterns as we are here. So if you are working along with us, you should have all of the frame members, the gussets for the chine and the knuckle cut and the gusset fillers done all stacked and ready to go.
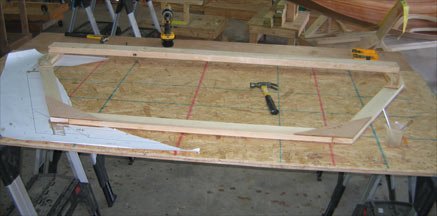
Here is where the patterns become invaluable. The patterns are used as a building jig for your frames. It is the fastest and most accurate way I know of to make frames giving a real sense of confidence when you are done. The picture at the top of this story shows us screwing temporary battens along the edges of the template. these battens will allow us to put the frame members tight against them during the construction phase giving us a pretty much exact duplicate of the pattern. I can not overstate how important accuracy is here. Take your time and get those battens right. Remember that the line typically represent the outside of your frames so you should see the lines and the battens should come right up to them and not over them. If done right, when the frame members are pushed up against the battens the edge should be right over the end of the line.
F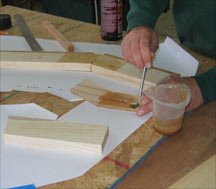 rom here the process goes really quickly. It is time to mix up your glue of preference. For our application, we will be using epoxy thickened with wood flour. Do not mix the glue unless you are sure all of your components are ready. You will also need whatever fasteners you plan on using to connect your gussets to the frames. Always believing in simplicity and expedition, we will be using a brad nail gun. We are often asked about the use of Gorilla glue for applications such as this. Gorilla glue is an amazing adhesive and certainly has its uses, however it has significant expansion qualities so I do not recommend it for applications firm clamping is not being applied.
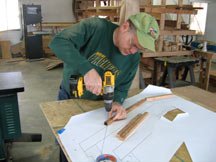
Start by spreading your glue on the connection joints of all members using acid brushes and put them in place along the battens. Now put the gusset filler in place and mark with a pencil where the ends are along the uprights and bottom members. Spread adhesive along all the connecting edges being careful to stop at the lines. The cleaner you do this the less clean up and sanding you will have to do later.
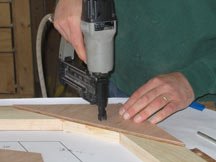 Now that ll the members are in place, put the gussets in place and again use a pencil to mark the edges. Liberally spread the adhesive on the underside of the gussets and on the frame members and nail or screw in place. Have paper towels at the ready to clean up the excess adhesive. You should also be conscious of where chines will eventually be cut in so that you are not cutting through nails or screws. Once this is done, gently turn the frame over so that you can put the gussets in place on the other side. and now you can back the frame into the jig again to put the upright members on the other side of the frame.
If this all sounds pretty simple, it is because it is. No magic here. At this point, it is a good time to check your measurements on your frame and cut a piece of plywood or dimensional lumber as a temporary cross member to hold the frame in shape while you put it aside and work on the rest. It is likely that the boat you are building has a requirement for such a member to attach to the building jig. If you are lucky you can temporary brace as your mounting member. The size of your temporary cross member should be taken directly from the plans so that when in place it is holding the frame apart in exactly the right width which will ensure that the frame dries in the correct shape.
That is pretty much the entire procedure for making a frame. You will probably have to cut notches for keels, battens and chines but that is all easily done after the frames are assembled.