The Secret of Clean Fiberglass Joints
 If you have ever tried to joint two pieces of fiberglass with a lap and got frustrated with fraying ends, this article is for you.
there are a few reasons to join or lap fiberglass layers on boats. Typically fiberglass comes in rolls of 60" or less in width. So if you are working on a boat such as the Pea Pod used in this discussion, you will need to have more than one layer simply to cover the hull. The second reason is to add strength to specific areas of the hull. typically the bottom. For instance if you are building a small wherry or canoe that you think will be dragged up on rocky shores, you will probably want a couple of layers on the bottom. Some boat plans have specific requirements for fiberglass layups and you should never do less than what is recomended.
When I write how-to's such as this, I will inevitably get email giving me the exceptions so in an attempt to stop some of that before it happens, let me qualify that this technique is primarily for smaller boats using 10 oz or lighter fiberglass.
Are you ready for the secret, here it is...
Blue Painters tape....TaDa!
It really is as simple as that, so let's run through the steps. First, as always, you need to prepare the surface for the glass. Different epoxies require different steps so be sure to read the insturctions, however in short, the hull should be clean, free of dust and foreign particles and sanding done. Assuming that you have already decided on the layout schedule of your glass we are ready to begin.
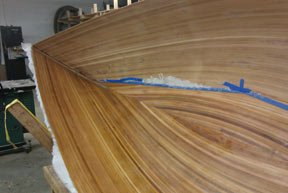
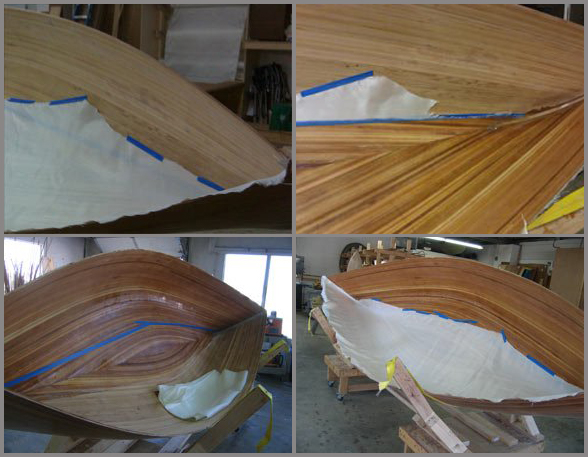
For our example, we will be glassing the inside of a classic rowing Pea Pod, using two runs of fiberglass. Each run starting at the gunwale or sheer and working its way to the other side of the hull. this accomplishes two things for me. First it gives two layers at the bottom of the boat which will have the greatest stress, and second, because the girth of this boat exceeds the width of the glass, it allows me to get from one side of the hull t other. Start by picking the point in the hull where you wish your joint or lap to land. Be sure to check and make sure that your cloth will reach that point. Then using painters tape, tape a line along the hull from stem to stem on your joint line. Be warned not to use cheap tape as it is tough enough to get the good stuff to stick to the hull. If you can't get it to adhere you likely have too much saw dust left on the hull and I would refer you back to the first step of preparation.
Now that your tape line is in place, you need to tack up your cloth to hold it in place and rough cut the cloth to fit. The rough cut is an important step here. The last thing you need is the cloth falling down while you are applying epoxy. Excessive cloth simply adds weight which gravity will take advantage of. That said, I seem to always need a little more than I think I do, so I cut so that there are a few inches hanging over the sheer and past the stem until I get very close and know where it will land and cutting the final trim close to the edge as I go.
You are ready for your application of resin now. the only trick is to not go past the painters tape. You can get resin up onto the tape and you should to make sure you have a clean line, but do not go past it.
Once the resin has dried, you can pick up the edges of the cloth, being careful not to tug too hard and use a razor knife along the tape line. Don't get too aggressive with that knife so that you mar the wood. A new blade will serve you well here. Once the epoxy is cured, you can give the edge a light sanding. The sanding should feather the edge and take off any residual glue left from the tape. Again, be sure to read the epoxy instructions here. Some epoxies blush and require specific steps between coats.
Now you should be ready for your second layer. This is pretty much doing the same thing over again. Define your lap joint line, put the tape in place and lay up your fiberglass cloth. Once it is cured, get another blade for that razor knife and cut along the line. the only difference here is before I sand or feather in the second layer to the first, I will run a coat of epoxy on the entire surface again to make sure the weave of the cloth is completely full. This is important so that you don't break the cloth while sanding. It also builds up along the joint line so that when you sand, it will feather nicely.
If you have never sanded epoxy and cloth before, don't worry about the milky white look that it leaves. It will return to clear when you put on a fresh layer of epoxy or varnish and if you are painting the hull then it certainly won't matter, but that is a different article.

