Adding Canoe Seat Risers for Strength
A LITTLE EXTRA WORK - A LOT OF EXTRA STRENGTH!
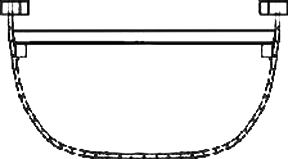 Seat risers and plank seats are typical for boats like the freighter canoes and the Adirondack Guide Boat. Seat risers also have a good role to play in canoes with scuppered gunwales. If your boat plans call for scuppered gunwales or if you decided to add them on your own, they significanlty weaken the mounting points for the seats. The seat riser is a way to have your cake and eat it too. Even if your boat plans do not call for them you should consider if they are right for your situation.
This is a much simpler operation than you may think however the steps are important. Installing seats in your boat accomplishes more than just giving you a place to sit. In most cases it also helps to pull the boat together from side to side. Basically it acts as a thwart, and as such requires good tight connections minimizing the mechanical stresses associated with the forces pushing down on the seat, (namely your tush) as well as the forces acting to push the sides of the hull outward.
Preparing the Seat Risers
 The first and probably the most important step is lining out where the seat will be. the method of doing this will vary from boat to boat. On some designs it is easier to measure up from the floor of the boat or the bottom of the hull and others make it easier to measure down from the gunwale. If you are adding support for canoe seats, then they can be mounted through the gunwales as typically done which makes for a handy way to mark where the supports will be. Most plans will give recommended seating positions and heights if required. When measuring for the placement of the seats, be sure to take into consideration the thickness of the seat blanks, risers and so forth to ensure the seat height actually ends up where you intended it to be. It is helpful to measure from as many positions as you can. Presumably your boat hull is symmetrical about the center line. This means that you can measure from the stem to each edge of the set to ensure that the seat riser is in the same position on both sides of the hull. By having the seat riser slightly shorter than the seat width means you can be off by a little without worrying too much.
Once you are convinced that your seat locations are properly marked, it is time to cut and fit couple of inches shorter than the depth of your seat. For example, if you seat blank is a 10" wide Ash plank, then your riser would be about 8" long. A typical seat riser blank for a canoe or small rowing boat would be about 3/4" X 3/4" X 8". There is nothing critical about these measurements other than making sure that the resulting riser has enough meat to it to take a screw and support the seat.
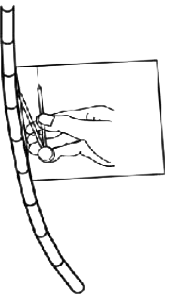
Once the seat riser is cut to length, you need to plane, sand or otherwise shape one side of the blank to match the profile of the hull. There is no right way or wrong way to do this, use the tools you are comfortable with. A simple way to accomplish this is with a simple compass and scrap of 1/4" plywood. Scribing takes a few seconds and is very accurate. Place the scrap of plywood against the hull at the riser location and run the compass along the hull putting a line on the plywood following the profile of the hull. Cut with a jigsaw or sand with a stationary sander. Make as many passes as necessary to get your final profile then simply transfer it to the seat riser. Once this profile is transferred to the riser you can plane or sand off the excess material giving you a perfect fit. The riser on both sides of the hull should be the same (at least in theory).
Applying the Seat Risers
 If you are following along, you should now have seat risers cut and beveled to fit as well as a clearly marked locations for your seats. The next step is to get the risers stuck to the side of the hull. Thank God for modern technology. There are a number of "rapid cure" epoxies available which dry in less than 5 minutes, so make sure you have a soda (or any of your other favorite libations) within reach. Carefully following the epoxy instructions, mix and spread to the riser. Place the riser to the hull and start drinking, hum your favorite tune or otherwise amuse yourself for the next 3 minutes or so (follow the instructions on the package to make sure you hold pressure for the prescribed amount of time.
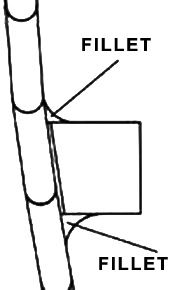
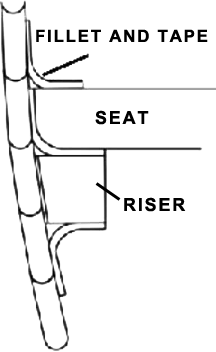
 Now that the risers are in place it is time to reinforce them. This is easily accomplished with a application of a fillet, pronounced (fill-let) and glass tape both above and below the riser. Take the time to do this neatly, it will save you a lot of clean up time. Using epoxy and wood flour makes a fillet which is not only structural but blends well with a wooden boat. Using other fillers such as micro-balloons will do the trick but in my opinion they are unsightly. For a fillet of the size you need here a plastic picnic spoon works well. The primary purpose of the fillet in this instance is to round over the edges in preparation of the fiberglass tape. Using blue painters tape to tape off the area before the fillet is applied will save in clean up time and make for a cleaner job.
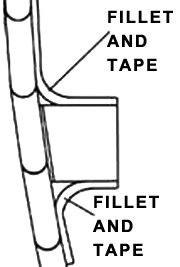
Once your fillet is in place and dry to the point it will not move when touched, you can apply the fiberglass tape. Above the riser, keep the tape on the hull the same size as the seat blank and it will be invisible when the job is done. For the purpose of symmetry ( I am a bit obsessive), make the tape below the riser the same dimensions as the tape above. You will want to give the glass tape a few days to dry before finishing off. Where there was tape, you should be able to cut away the excess with a sharp razor knife. A little hand sanding and touch up with clear epoxy or spar varnish will blend the edges.
This step is a test of patience. The natural inclination is to go for the win on the first cut of the seat. this will generally end up with a loose fit. The reality is this is an unforgivable mistake. Pretty much all wood strip hulls naturally flex inward when taken off the molds. This means to get them back to their intended shape you need to flex the hull back out. So unless you are a wizard with jigs, this is definitely a job for two. Spread the hull with a temporary thwart and use the same scribing method described above to make a template for where the seat meets the hull. Once you have that profile down, it is a simple matter of getting the length right. Best rule of thumb here is to remember that you can always take more off but it is very difficult to put it back on. You only need to get it within an eighth of an inch or so because when you take out the temporary thwart, the hull will spring back tight against the seat.
Important to remember

Do not permanently install any of the seats before you have all seats fitted or you will not be able to spread the hull.
 If you are working on a hull where you won't be pounding the waves or have a good deal of stress on the seats, you can install the seats with screws move on to the seat post. If you think there will be some bouncing around, you should consider putting a fillet and glass tape above the seat after setting the seat in a bed of epoxy mixed with wood flour between the seat and seat riser. This is the best way to install the seat but it is also a very permanent way of installing the seat. The only conceivable downside to this type of permanent installation is the ability to replace the seat or the occasional sanding and varnishing of the underside. Let's face it, how often are you really going to do that? Now that we both agree that you won't be varnishing the underside of the seat often enough to make a difference, we can also agree that the only downside is if repair is necessary. Repair can still be made if necessary (which is not very likely), but it will take patience and some good shop tools to grind out the connection of the seat and risers.
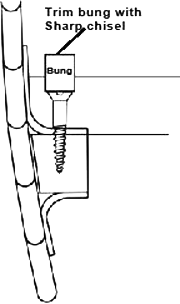 If you don't have them, go and get them. You don't want to have come this far and crack the seat blank for lack of a $5 item. In order to make a neat job of it, use the compass and scribe a line in 1/2" from the hull along the seat so that your screws follow the hull line. If you are using brass screws you can flush mount them and varnish them over. If not, you, you can when putting screws down from the seat to the riser countersinking is not an option so if you purchase bungs (or plugs) and fill the screw holes. If you want to make decorative bungs from wood such as Purple Heart or Mahogany, you can purchase bung cutters for just a few dollars and it makes for a dramatic look.
Installing the seat posts
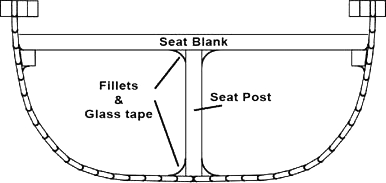 If you are installing seats in a canoe you can omit this step entirely as a canoe is narrow enough that the seats if built well should not sag. Seat posts are exactly what you think they are. Posts that connect under the seat to the bottom of the boat. These can be a simple as a blank cut from the same stock as the seat or as ornate as a turned style. These are attached using the same methods you used to attach the seat risers to the hull. The only difference is the tape job. In connecting the seat post to the hull, you may want to consider three layers of tape in progressively larger widths. For the sake of argument, start with a 1" piece of fiberglass tape, progress to a 2" then a 3" piece to top it off. You don't want to have to deal with a lot of stray epoxy and glass strands so tape off the area at each application so that the edges can be clean and straight. If you use this same method on the connection from the post to the seat blank, you will eliminate the need for any mechanical fasteners through the seat to the post.
And there you have it. Sizes and shape will vary from boat to boat but the theory remains the same.

