Making a Proper Scarf Joint - Boat Building Joinery
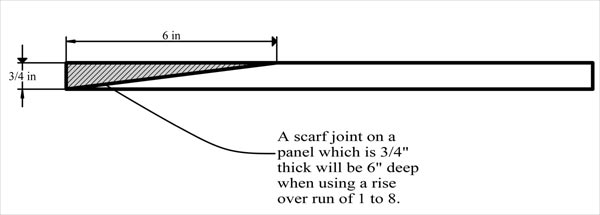
 If your boat plans call for a scarf joint, don't panic. Given the right tools, this is a simple job to do. the trick to getting past the anxiety of doing this is to simple get out the tools and do one. The concept of a scarf joint isn't complicated. It is a simple matter of of cutting a ramp on the wood which has a run of 8 times the rise. That is to say that if you are working with 3/4" plywood, you want to have a scarf which is 6" deep. The run can be as much as 12 times the rise and your boat plans may specify the ratio they want you to use. For this article we will focus on plywood scarfing. The concept is the same for dimensional lumber, however there are simpler methods for cutting scarfs in dimensional lumber than there are for plywood. Practicing on inexpensive lumber is a good way to shake out the doubts. In fact if you can scarf cheap plywood then the good stuff is a snap. The reason for this is because of the quality of the interior plies of wood on say marine grade plywood versus the home building stuff.
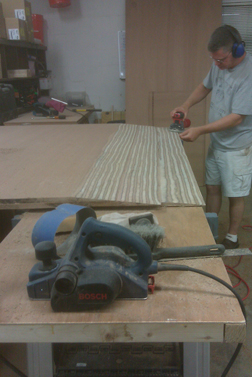
Now there are those that would tell you that stacking multiple layers of plywood and setting them back the distance of the scarf is an easy way to scarf more than one panel at a time. In theory this is true and I have done it many times, however that said, I will tell you that I personally have better results scarfing one ply at a time. It takes me less time to scarf 3 panels individually than it does for me to stack 3 panels and scarf them all at one time. In these pictures we show stacking the panels, you will have to try both to see what works for you. The panels shown here are 5' wide by 3/4" thick, so the scarf will be 6" deep and will be used for the bottom of a large power dory. You can see that we have 3 sheets stacked and when this side is done we will be flipping them over and scarfing them on the other end. This will not be enough to cover the bottom of the entire boat but stacking more than 3 sheets of 3/4" plywood makes the reach simply too far for me. Your boat plans will undoubtedly tell you the type of planks you will need.
Start by finding or building a good solid work table that will support the width and breadth of your planks. Be sure it is good and steady as the last thing you want is the planks moving about as you are trying to make your scarf. I use a table made to fit on top of two saw horses the same height as my work bench and I clamp or screw my panels together. The only thing to watch for here is to make sure that the ends of you plywood are flat to the table or each other and not lifting up which will distort your scarf joint.
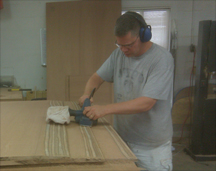
 As you can see from the picture I am far from a purist when it comes to tools. It makes me chuckle when I see a book or another article showing someone with their faithful Stanley plane working their scarf joint. I am not saying it won't work, I am simple saying why??? A cheap power plane these days is about the same price as a good hand plane and trust me when I tell you that the power plane will take that wood down far faster than the trusty Stanley If that makes me a hack, then I say plug in and hack away!
I use the power plane to get me close (very close), just be sure that as you get close you lower the cutting depth of the plane so that you are sure you don't over do it. Remember that the trick to this is when you are don that all the angles should be the same. The interesting thing about working with marine plywood is that it gives you a built in gauge. As you scarf the planks you will see the lines of the plies showing distinctly. If your scarf is true you will see two things. First, the lines will be straight across the planks with no waves in the ply lines. typically this gets lost a n inch or so from the ends as that is where the plane enters and exits the work area. You can either pay particularly close attention to this or do what I do and cut the planks a few inches wider than you will need. The second thing you should notice is that from scarf to scarf, the plies look the same. Now this only works when all of your plywood came from the same batch. marine plywood has standards, however the interior plies can vary from panel to panel. This is only a visual guide as you are cutting your scarf. The only true measurement is a tape measure which will tell you the depth from the end of the scarf to the end of the plank.
 Once you get close, bust out the belt sander with a new belt. This is the best way I have found to finish off a scarf. If there are slight waves in your scarf joint, here is where you can get rid of them. Be sure to use a belt sander with a flat bottom. I have seen some models with a contour to the bottom of the sander which defeats the purpose of this exercise. If your belt sander does not have a flat bottom, this may be a good time to break out the trusty Stanley plane. Not to keep score, but so that you have an idea of how long it takes, the three panels you see in the picture took us about 2 hours from start to finish on one side. Interestingly, doing one panel at a time takes me about 30 minutes. Cutting a scarf joint is not something that needs to be done all at once. Any time the fancy hits you, dive in for an hour or so and it will be done before you know it.
Our boat plans tell us that this particular scarf joint can be finished on the boat. The boat we are building is a flat bottom power dory skiff, so there are plenty of landing places on the bottom of the boat to hold the scarf down as it is glued up. You can find more about that boat here in the boat building journals.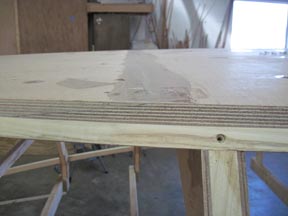 There are people who will argue for different adhesives when it comes to marine joinery. That is a topic for another article. For my purposes, using epoxy with a filler is the way to go. These are the steps I use. I am a fanatic about making sure I give the epoxy as much time as possible to seep into the wood so I always use slow hardeners when working with glue and follow these simple steps. I mix the epoxy and with a throw away brush, I liberally paint the epoxy on all surfaces of the joint. Now I am not saying it should be dripping off the wood but the wood will tend to soak up this layer of epoxy so don't be cheap here. Once that is done I take the remainder of the epoxy and use a thickener to mix it to about the consistency of honey and I spread this on one side of all the mating surfaces. Keep in mind that when scarfing the panels in place on a project such as the one we are working on that you have to consider all glued surfaces and I follow this procedure for all surfaces. When gluing in place, be sure to clean all surfaces of excess epoxy and squeeze out after the clamping and screwing are done. It is a lot easier to spend 15 minutes with a putty knife now than it will be to spend 2 hours with sandpaper later. (believe me!)
Take a second to look closely at the picture on the right. Notice how when a scarf joint is well done, the side view shows the joint as barely distinguishable. Just remember that when working with epoxy, the idea is not to squeeze out all of the glue. in fact, that is a bad thing. You simply want a good firm connection between the two members. The epoxy with filler by its nature is not only a good glue but a good filler as well. Once I start to see a bit of a squeeze out, I am done clamping.
That is all there is to it. The last words of wisdom I would leave you with is this. The first scarf joint you try on plywood should not be on a $100 sheet of Mahogany marine plywood. Take a couple of hours and try it out on a cheap piece. It will build confidence and I am sure you will learn a thing or two along the way about technique.

