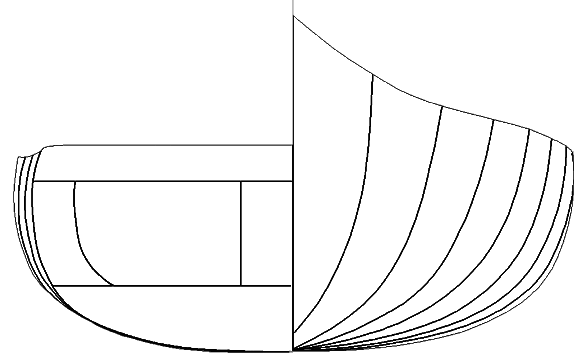
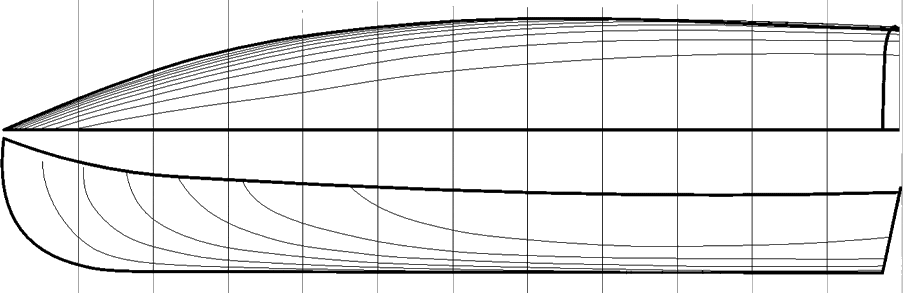
18' Great Northern Freighter Canoe
 For those of you who have dropped by the shop, you know that you can always find at least a couple of boats being built. We very rarely however build boats for customers. Most of our builds are either for locals we know or more often than not are given to charities for auctions. This allows us to keep doing what we love to do (build boats), without having to purchase acres of land to store the boats we have built.
Over the last couple of years we have been asked a number of times to shrink our 20 foot Mi'kMaq freighter canoe to an 18 foot version. Well for those of you who have lofted boats, you know that there is more to it than to simply open a program, squeeze it down a couple of feet and hit the print button.
We received a call from a man in Texas a couple of months ago who not only wanted the 18 foot freighter canoe, but wanted us to build it for him as well. Now normally we would have said no but there were a few things which aligned to push us in the other direction. First, our friend in Texas has an issue which keeps him from building the boat himself, though he is certainly capable of using it. Second, we were just having meetings around here a few days earlier planning on our winter builds, so that shop would be available for the build. Lastly, we do send out a DVD with the Freighter which covers a good deal of the building project, however it isn't specifically for a freighter canoe and we have been looking for an opportunity to put together some more building instructions for that boat.
Long story short, we will be building an 18' Freighter canoe in the shop this winter set to launch in May of 2014 (or sooner). We debated filming the project, however we cannot pull together the resources under the time constraints we have to film for 200 hours between now and May. So what we will do is video segments to post here as well as a full building journal.
If you have questions or just want to chime in, you can ask them in the forum and we will be happy to answer. I hope you enjoy the journey.
Best Regards,
Jack Battersby
DETERMINING YOUR HULL MAKEUP
How to Determine my Hull Material for your Freighter Canoe
With most of our boats we simply give a list of suggested materials and people follow them. Materials for a boat like this are very dependent on the supporting components of the boat as well as the intended use of the boat. As originally designed, the 20 foot freighter canoe is to have a series of bulkheads; one at the termination of the deck, and one under each seat. This effectively breaks the hull up into 5 separate sections. With that small amount of exposure, a light weight hull could be achieved using ¼” X ¾” strips and 10 oz e-glass on the inside and outside of the hull with a double layer on the bottom inside and out.
The freighter canoe has proven to be a design that people want to fiddle with. That’s fine, wooden boats should be fiddled with to make them right for you. However, when you fiddle with things like bulkheads on a 20’ long freighter canoe you can get into trouble fast with hull flexing. So, in an effort to not pigeonhole builders into one method of building I am putting a few thoughts out there so that people can make some intelligent decisions and stay out of trouble.
 Just like an aircraft wing, the outer shell is very dependent on the support structure holding it together. The shell combined with its supporting structure needs to be sufficient to counteract the forces being applied by waves pounding on the hull or the hull riding between waves.
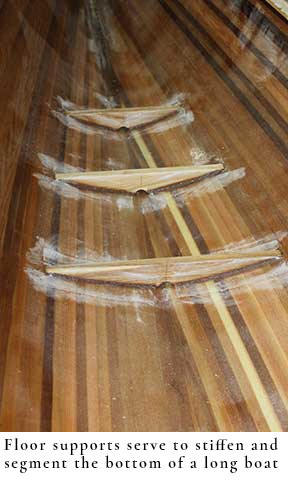
The single most important thing to keep in mind is the bottom needs to be stabilized on a boat of this length and width. That can be done with bulkheads as suggested in the plans or floor supports and planking with the seats tied in with a post at each seat. The freighter canoe in this journal is being built with floor supports and planking. The floor supports support and stiffens the bottom from center up to the 3” waterline. These supports combined with the seat risers, seats and forward deck will stiffen the deck up nicely. It also allows for the free flow of water in the bilge with limber holes in each floor support. The patterns for the floor supports come with the 18’ version of the freighter canoe and the 20’ version will be revised to include these support patterns as well. If you have a previous version of the plans and wish to have these patterns, you can either make them by using the bottom 3” of each station mold starting from the first mold after the transom and stopping at the form just before the bulkhead location under the deck or you can write or call us and we will get them out to you.
While making your decision on whether to use floors or bulkheads consider the difference in height from the floor of the boat to the seat and decide if the reduction in space is acceptable to you.
TOUGHEN THE HULL UP
Before you determine how to skin your hull, you need to determine how you are going to use your boat. Builders tend to like the brightwork of the cedar hull showing through. As long as the internal structure is supported as discussed above, 10 oz e-glass used as outlined in the plans will suffice. 10 oz glass, particularly 2 layers of it will not be as clear as a single layer of 6 oz glass typically used on paddle canoes or kayaks. That said, it is not acceptable to use those lighter weight cloths on a boat of this shape or size. The single layer of 10 oz cloth on the sides of the hull will be clear enough for discriminating builders.
Here in the Cape Cod area of Massachusetts, our shores are sandy with very few rocks of any kind and sharp jagged rocks are near nonexistent. I do realize that not everyone lives here though, so here are my suggestions to combat the tougher shores of your area.
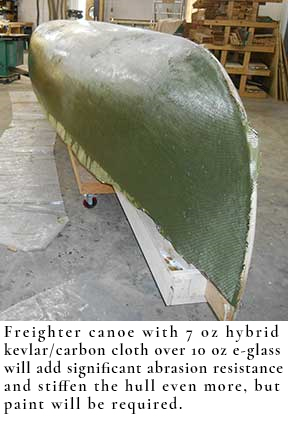 If you are looking to make your freighter canoe into a work horse to last a lifetime, then you will have to make a couple of accommodations for that. The first decision to make is if painting the hull is an option for you. The boat in this journal will be painted a deep green with trim of Ash and Sapele woods with a Sapele outer transom. The interior of the hull will be left brightwork and the wood will be on full display. Because of this decision, I now have the option to use some more exotic cloths. In this build I am using 10 oz e-glass as in the plans and that is then covered with a hybrid cloth of Kevlar and Carbon fiber. This cloth goes on just like e-glass however it is a very tight weave and the air bubbles need to worked out as you go. This is easily accomplished by using your gloved hand pushing the bubbles out and a fiberglass layup roller.
The upside of using this cloth is a very tough skin which will take the banging of the occasional rock or the beaching of the boat on a less than accommodating shoreline. The downside is it will add a few hundred dollars to the build and of course a little bit of time. However if you are combating the elements it is dollars and time well spent. This cloth Kevlar element is very abrasion resistant and the carbon further stiffens the hull for impacts.
The last suggestion for making your boat tank tough is the actual planking of the hull. If you are creating a real workhorse, and I mean a freighter canoe which will really be put through its paces, used constantly then you can take the above method of using e-glass combined with Kevlar/Carbon and put that over a hull which build from ½” thick planking instead of ¼” planking. I know that natural inclination of a builder is bigger is better, and in fact it is in this case, however consider if you really need this kind of toughness. It will undoubtedly yield a boat that with proper care will last a lifetime, but the boat will be heavier and the cost of the hull will literally double. You may want to consider this type of construction if you plan on using your freighter commercially for fishing excursions or you know you will be regularly be banging off of rocks or taking on high surf or swells. It is defiantly not needed for gentle rivers or flat lakes.
FINALLY, ABOUT A KEEL
My point in this history lesson and discussing the engine size is to get the point that the only real reason to have a keel on this boat would be a concern over sliding in the turns. For those of you who are inexperienced with this, it is when the bottom of the hull slides along the water in a turn. This is very common on skiffs, hydroplanes and other flat bottom boats. A freighter canoe is not a speed boat and shouldn't be treated like one. 10 to 15 knots should be the goal. You won’t be pulling water skiers, but you will get to where you are going a good clip.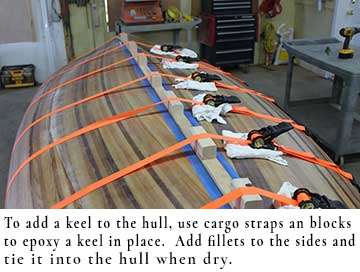 These freighter canoes can be used in a number of different ways. Historically their intended use was on wide easy flowing rivers for excursions or hauling materials up and down the river. As primarily a river boat, they tended to not have keels as that would only serve to make turning on the river more difficult. However I recognize that today’s boaters will likely be using them at least as much on the lake as they will on a river. Our freighter canoes are built to need only 10 to 15 hp engines for operation. We have a customer in Canada with a 20’ freighter and 10 hp ferrying 10 people up the Columbia River with satisfactory results. Older freighter canoes which were built with a completely different type of construction typically using frames, bulkheads, ribs and canvas were considerably heavier which is why you see people using 40 hp engines on them. These boats would tip the scale at over a thousand pounds.
The benefit of not having a keel is greater maneuverability. As already pointed out, river turns will be much easier, and if you like fishing (and who doesn't), you will find getting into the perfect spot and swinging the freighter canoe about much simpler without a keel.
I hope this write up helps in your decisions, but if you still want to go over your options, feel free to contact us and we are happy to go through it with you.
PREPARING TO BUILD YOUR FREIGHTER CANOE
I have found over the years that making all the parts you need just when you need them is not necessarily the best way to work. So as boring as it may be, before we start putting anything together, we are going to cut and glue a few things first.
CUTTING THE CANOE FORMS FOR YOUR FREIGHTER CANOE
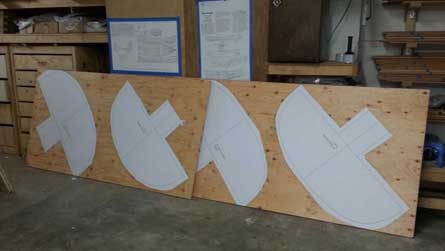
 The forms for this canoe are no different from any other canoe with a couple of exceptions. They are about 20" wider than a typical canoe, and the transom is framed from hardwood and not a form at all.
Because the body forms are so much larger, there are a couple of things you may want to consider. First, even if you have that big honking band saw, you may want to consider keeping it powered down for these guys. I have found it much simpler to use the Saber saw (otherwise known as a jig saw). There is a right way and a wrong way to do that. First off, all blades are not created equal. be sure and use a fine cut blade. It may go a bit slower, but it will be easier to control and will leave a smoother edge. Second and probably just as important, it is likely you have a switch on the side of your jig saw and if you play with that a bit, you will notice that it will push the blade forward and back at an angle to the cutting surface. There is a reason for that. If you flip it so that the blade bottom pushes forward you will find that you have a great deal of control and the cuts are very smooth. Most people never touch the switch, but give it a try it works well. You just need to remember to flip it back when you are making quick rough cuts.
All boat plans from us that say them come with patterns come with separate patterns for each station, cradle, floor supports and so forth. We do not stack patterns and make you trace them. There is too much room for error when you do that. That said, it is a simple matter of laying out the patterns on a piece of 1/2" plywood for the body forms use a little spray glue and gently and carefully roll them out. With patterns this size you may want to enlist the help of a willing soldier.
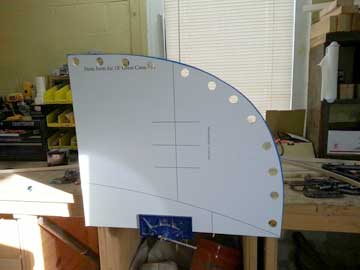
When cutting forms, I have always found that cutting just proud of and leaving the line is the way to go. By doing that you can take the cut form to a bench sander, oscillating sander or use a handheld sander to sand them right down to the line. That will give you a perfect form every time. If you have a bench sander it will take about 30 seconds per form to accomplish this.
One area to be particularly careful is the base of the form and the profile height. Take you time and get this right as it defines the entire profile of the boat. It isn't hard to get this right, just takes a bit of patience.
 The stem form is different in that instead of using 1/2" plywood, you will be using 3/4" thick plywood. This is because your inner and outer stem will be 3/4" thick and it give a good landing surface to make sure you keep your stems straight. As you can see, we have out stem mounted in a bench vise with the holes cut into it for clamping the inner and outer stems as we glue them up.
That is really all there is to cutting out forms from our patterns. Remember that we are not launching our boat to the moon. People get very nervous about it, but if you take your time and just keep it withing about 1/16th of an inch you shouldn't have any issues.
With the forms done, we can move onto our transom frame. Note the word "frame" and not "form". The transom frame will is a permanent part of the boat and as such care should be taken when choosing wood as you will be looking at it for some time to come. This boat will have an Ash frame and ultimately have 3/4" Sapele planks on the outside of the transom. Cutting out the pieces of the transom is virtually the same as the forms in that you use spray glue to glue the pieces down to the frame stock. I would suggest that where possible you start with a good clean flat side and match up what you can to save you a lot of cutting. You most definitely want to cut proud of the line and sand back in with these as well. When all the pieces are cut I use a dowel jig at each union. I don't do this so much for strength as I do to aligning pieces for glue up. The transom frame will be glued with thickened epoxy at all the mating surfaces and ultimately have planks on the outside so strength isn't an issue. Having a couple of dowels at each mating surface does however keep everything aligned nicely.
 Once you have dry fit all of the pieces and you are happy with it, go ahead and mix some epoxy and wood flour together. Not too much wood flour, just enough to have a bonding agent but not enough to thicken the epoxy. The DVD details mixing epoxy for gluing. Also rememeber that clamping for an epoxy glue up is not the same as a yellow glue clamping. With yellow glue or carpenters glue you try to put a great deal of clamping pressure. With epoxy you try not to put too much pressure. Just enough to get everything held in place. If you clamp too tight it will squeeze out the epoxy and you will have a starved joint.
Before you walk away from your brand new freighter canoe transom frame, be sure and drop a straight edge across it to be sure that the clamps are not bowing the frame. It needs to be flat all the way across.
I like to try to do as much gluing with epoxy as I can as it is difficult to mix very small batches, so we went ahead and glued up the inner and outer stems at the same time as the transom frame so we wouldn't be throwing away to much of the stuff.
Next we will be going over the building of the strongback, but it is off to the shop right now. Can't build a boat from my desk chair.
THE TRANSOM JIG AND STRONGBACK
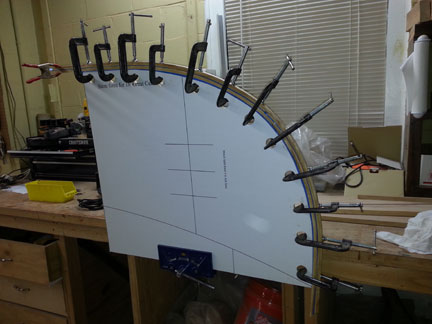
 One of the great things about being an active boat building shop as well as supplier of plans and patterns is we get a real good sense of what we can supply to our customers which will make the build easier. One of the things we noticed here was it was far simpler for us to design a jig to hold the transom of the boat on the CAD system than it was to do it in the shop my measurements. I was skeptical at first that the jig would be accurate enough when we started this, however it has worked flawlessly and we never start a boat that has a transom without one of these jigs.
In days past, it was typical to build a generic support system with an angle to it and you would slide the transom or transom frame up and down and left and right until it aligned to where you needed it to be. Now we take all the measurements on the computer as we loft out the boat and design the jig with full dimensions. It is basically a platform at the right angle and set at the right position so that all you need to do is set the transom on top of the platform, center it and use either hot glue or temporary screws to hold it to shape.
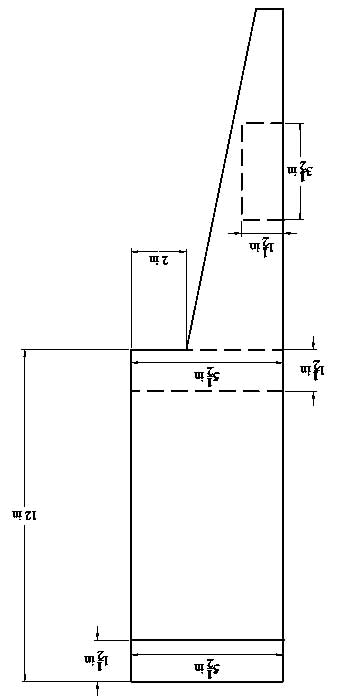
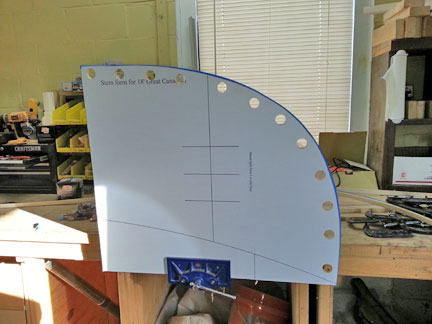
The plans will have a diagram which looks something like the one that you see here. with the side profile outlined with full dimensions as well as reference to the cross members needed, where to put them and how wide they need to be. We give all of the dimensions on the patterns pretty much to check your work, however, these are made the same way that the boat forms are made by gluing them to the base wood and cutting around the lines.
The materials for these jigs is a good quality, straight piece of 3/4" stock. We typical use a decent plywood for this. The spreaders we design so that they can be standard 2 By stock so that you don't have to go looking for something or mill special pieces of wood. For this jig, a couple of 2 by 6's (or more preciously 1.5" X 3.5") and a 2 by 4 (or more.....you get the idea).
The jig needs to be solid and square so that everything aligns. Typically we use a stapler with 1 1/2" staples to get it together and then sink some 2" screws from the sides into the cross members. If you cut with care and build it square you will find the jig gets you right to where your transom needs to be. It has never let us down. Here are a couple of pictures of a finished jig.
Well be needing a place to put all of these forms soon, so next we will get our strongback ready. Any of you who have seen one of our DVD's have seen us build one of these so I won't get too deep into how they are made.
 Strongbacks need to be strong, straight and not susceptible to warping and twisting. The best thing we have found for this is 3/4" plywood. The plans for any of our boats have specific measurements for the strongback, so we will avoid those here so that people don't get confused. Any of you who have built our boats before, know that we make our strongbacks in sections that slide together. We originally started doing this 20 years ago because we found ourselves throwing out perfectly good strongbacks because they didn't meet the needs of our next project. So by building the strongback in three sections, you can mix and combine different ends with different centers to come up with different sizes. They don't last forever this way but they can usually make it though 3 or 4 builds before they are ready for the scrap pile.
 Basically a box strongback is just that, a box. The one depicted here is two 8' sections with a box in the middle of them approximately 4' in length which allows us to slide the ends in and out until we get the desired length. Be sure you put cross members no less than every 18" to keep the box sturdy. You can see from the picture on the left where the end of the box meets the center piece. They are connected by setting 5 or 6 screws through the sides.
If you look closely at the top piece you can see a perfectly straight line down the center. The tops are just 3/4" plywood a couple of inches wider than your box underneath. In order to get the line, we put it on a table saw and run a thin kerf blade about 1/16" deep down the center. If you don't have a table saw, you can use a chalk line, but you will need to borrow someones saw to get the strongback built unless you order a kit from us. When we ship kits, we ship them in crates that can be used as a strongback. It takes us a bit longer to make them but customers have found it handy.
If you have the line cut down the center, you will need to align the different sections of the strongback so that it is straight from end to end. This picture shows a bright pink neon string down the center of the strongback. We attached one end with a clamp and the other to a screw at the distant end. Then all you need to do is pull the string tight slightly above the strongback top and align the boards so that the saw line is straight end to end.
Once the top is screwed down, you can mark off your form positions and get the forms ready for mounting. Before we do that here, we need to glue up our stem pieces. They have been out of the steamer and bent around the stem for a couple of days so they should be dry enough by now.
BENDING AND GLUING CANOE STEMS
There isn't much difference from a standard canoe stem and the freighters other than the size of them. So if you are using a pipe to steam you will likely need to have it able to sit on horizontal supports as it won't stand up vertically very well. A simple shelf should to the trick.
Each of our boat building DVD's covers steaming and steam sources, however for those of you who have not seen them, here is a quick recap.
STEAM SOURCE:
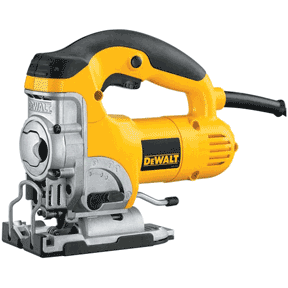
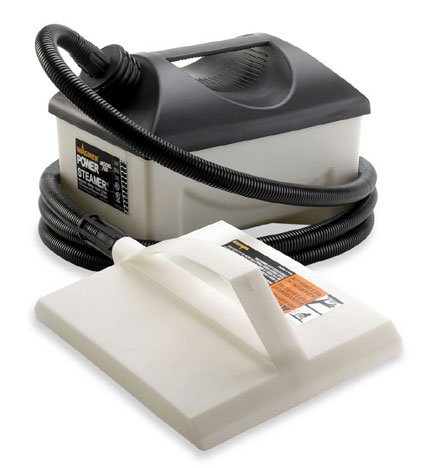 In the early days we showed people how to use an electric tea kettle and a piece of pipe to make a simple steamer. However in the last 15 or 20 years, electric tea kettles have become harder to find and when you do find them, they are not near as inexpensive as they used to be. As a very able substitute, you can easily find inexpensive wall paper steamers. In fact, they will hold more water and put out more steam so if you don't already have an electric tea kettle, then the wall paper steamer is the way to go. The Wagner model shown here is $50 at the local big box store. You will need to uncouple or cut the steam hose at the business end. Some models may make you cut it off others allow you to twist it off. Then you will need to devise a way to insert the end into a pipe or a simple steam box. This can be done with less than $10 worth of PVC couplings and a little duct tape. All you are looking to do is insert the hose into the steam chamber and capture the steam. There are other nuances that go into a steam chamber but that is for another article.
 Cutting the freighter canoe stem form is no different from cutting any other body form. Simply glue the paper down and cut around the lines. In recent years we have been putting two sets of cutting lines on the stem forms. One set for a form yet to be cut for final height and another dotted line set shown the ultimate cut height for after the inner stem is mounted. We do this for those of you who are uncomfortable steaming and gluing both the inner and outer stem simultaneously. However if you are an old hand at it and comfortable doing so, you can go ahead and cut right to the final depth and take care of both at once. It is helpful to have another set of hands to hold the stem pieces in place while they are being bend around the form.
 Before you can bend your stems about your form, you will need to make some holes to clamp them down during the bending and gluing phase. You will need either a Forstner bit or a paddle bit with about a 1" diameter depending on the size of your clamp ends. As you can see, I like to put a hole about every 5" to 6" Not so close so that it makes the form weak, but not so far away that you don't get a good representation of the shape when clamped. Be sure and have the outside of the hole at least 1 1/2" from the finished edge and don't go too close to the depicted waterline.
Steam bending is the same as the glue up, only without the glue, so I will skip right to the glue up. Personally I have glued up over a hundred set of canoe stems, so I glue up both the inner and outer stem simultaneously. Before you begin to glue, you need to tape up all the edges that you want to make sure don't get glued together. This means along the edge of the stem for sure and if like me you are gluing both the inner and outer stem at the same time you will need to have tape on the top edge of the inner freighter canoe stem as well.
It should be noted, that on this boat we will be putting a keel along the bottom of the boat per the customers request. We use the same method of doing this as we use for the Whitehall boats and show in the DVD. This will require you to steam up an extra length of stem piece, and put it aside until it is needed. So you will be steaming 5 pieces, however only gluing 4 (2 inner and 2 outer) stem pieces.
I think it is time to mount the skeleton of our freighter canoe to a strongback next.
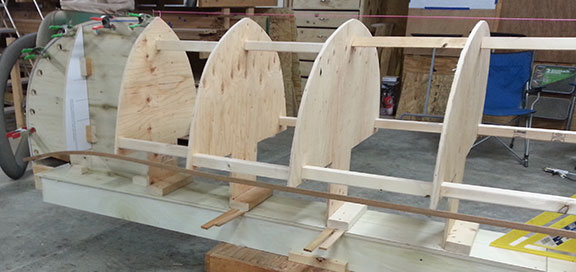
MOUNTING AND ALIGNING THE FREIGHTER CANOE FORMS
Mounting and aligning the forms for this Freighter canoe is not too much different from a typical canoe or kayak build and is covered in some depth in all of our DVD's, so I won't go through all the gory details. You can find all of our boat building DVD's by clicking here.
Like any other boat building project, you need to mark the form locations on the strongback with a perpendicular line at each location to the centerline of the strongback. On the Freighter canoe project, it is simplest to start with the mounting location of the transom and work your way forward.
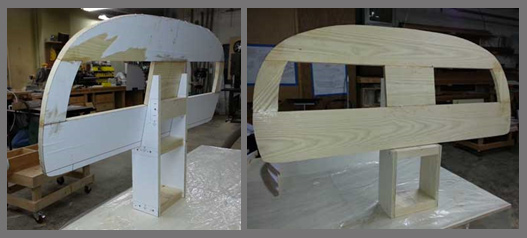
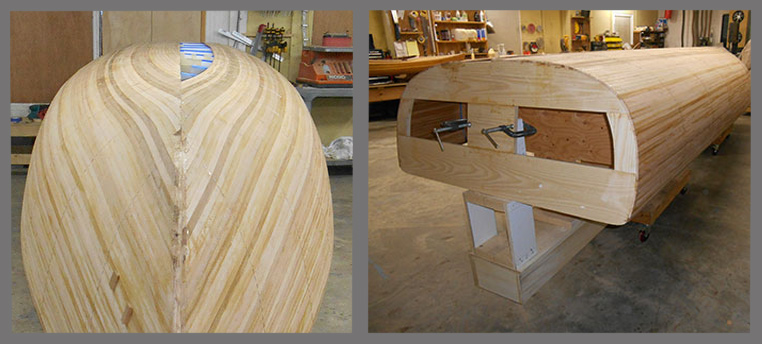
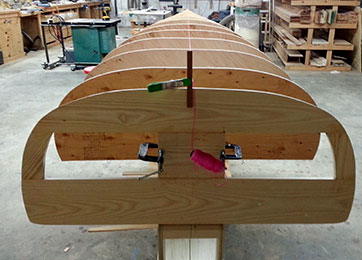 I suppose it makes sense to start with the obvious difference. As we showed in a previous post, the transom is mounted on a special support which is well defined in the actual plans. Just like the buttress blocks on a standard form tab, the base of the transom mount needs to have a centerline defined on it. Align the mount to the centerline on the strongback and it should be square. Again, to reiterate, the mount is designed so that if built to the specifications on the plans, it should be a simple matter of setting the transom on the jig and you are done.
If you look at the picture of the transom to the right, you will see there are a couple of C-clamps holding the trasom to the mount.
Just as a general maintenance not, be sure and sand off and clean up the interior of the transom prior to mounting it. It is far easier to take care of that now then it will be when the boat is stripped. The outside will get glue and epoxy on it as this process goes on, so I wouldn't waste a lot of time on that now. Make sure and transfer the centerline of the transom to the wood before you sand off all of the pattern.
 You will also probably see there is a small stick of wood attached to the transom at the top with a bright pink string attached to it. The Stick is just a way to hold the string for the alignment of the forms. I find it simple to just use a dab of hot glue and put the stick to one side or the other of the centerline of the transom. It is important to make sure that you mount it so that when you wrap the string around it that the string is directly over the centerline of the transom.
The picture to the left shows the stem form attached and the inner stem mounted, which again is the same as any other canoe build. Using a small brad GENTLY nailed into the end of the stem, loop one end of the pink string from that nail back to the small stick on the transom. Now you will be able to eyeball down the centerlines of each form to get them all centered. I find that it is helpful for me to transfer the centerlines of each form pattern to the top of each form. It just makes it easier for these tired old eyes to see the centers.
It is best to do this process with two people, with one person guiding another to add shims on one side or the other of the forms.
We often get the question about the need to have a level floor. It is absolutely irrelevant how level your floor is. I tell people that you can mount your strongback to the wall and build it on its side if you like. What is important is that each and every form is aligned with the one next to it and they are all centered on the centerline of the strongback. Both of these things can be accomplished without regard to whether or not the floor is level.
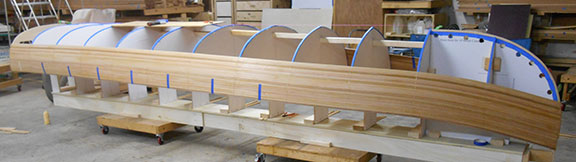
There is one other peculiarity to the mounting of Freighter canoe forms, or any forms for any boat that are taller than a typical canoe. If you have spent much time on this site or watched any of our DVD's, we show you how to build small roll around platforms for the building process. Typically we show the platform about 18" off the ground which puts the boat at a good height for most people to strip from sheer to center. This boat however is higher off the strongback than most boats due to the depth of the boat and the rise of the stem. Because of that I recommend lowering the platforms. We have a set in the shop for just such an occasion which with the 4" wheels stands just 10" off the ground. They put this boat at just the right height for my 5'8" frame.
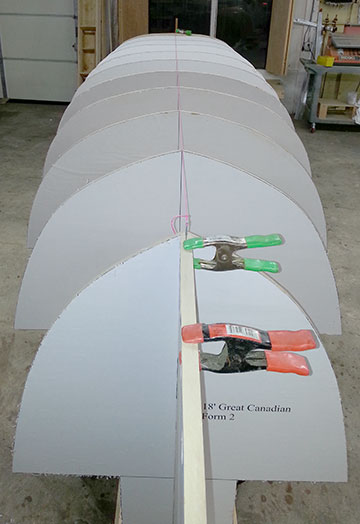
 The picture to the right basically shows you every aspect of mounting the body forms of this freighter canoe and again, all of the offsets for the mounting are found in the table of offsets of the freighter canoe plans.
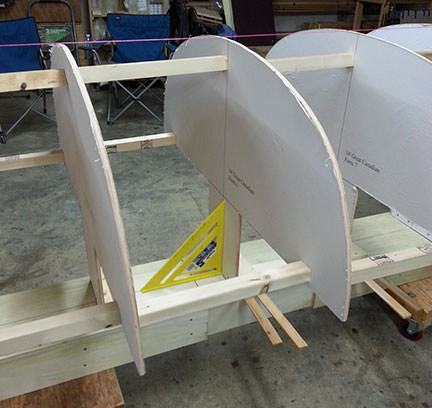
So taking them one at a time, lets go through the steps. Assuming you have already made your Buttress blocks and properly attached them to the forms, and the strongback, the only added requirement to this boat, or any larger boat such as the Whitehalls, is the shoring up of the forms. This can be done in a number of ways, and we typically show just using some scrap strips and stapling them at 1' intervals around the forms to get them at exactly the right separation. Here I am showing you a slightly different way. I took a 2X4 and ripped it down the middle, then cut them at the appropriate width so that I could hot glue them from one to the other all the way down the boat. Assuming that your stem and the first full body form are sitting perpendicular to the strongback, you can start at that end and work your way to the transom. Note the "rapid" square in the picture. It is important that not only are the forms the right distance from one to the other but that they stay absolutely perpendicular to the strongback. By doing this process, you have a stiff skeleton to work on as well as be assured that they forms will not twist over time as you are stripping the hull. Just as an example, these forms are separated by 18" from forward face to forward face. Because the forms are made from 1/2" plywood, I made all of my spacers 17 1/2" long. Doing this method is also a good second check to make sure all of your forms are spaced correctly. If you put the spacers in and the form is no longer squared up at the tab, then something is going wrong and you need to stop and find the problem.
 You will note that there is not easy way to get a spacer from the last body form to the transom. Don't worry about it because as I have said a couple of times, if you made your transom mount correctly and put it at the right spot on the strongback it should be exactly correct.
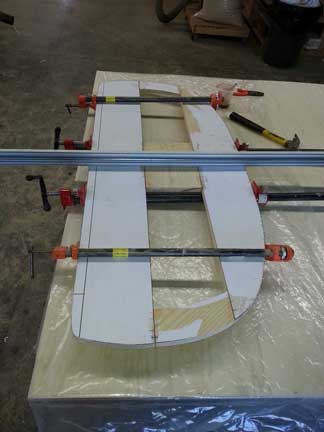
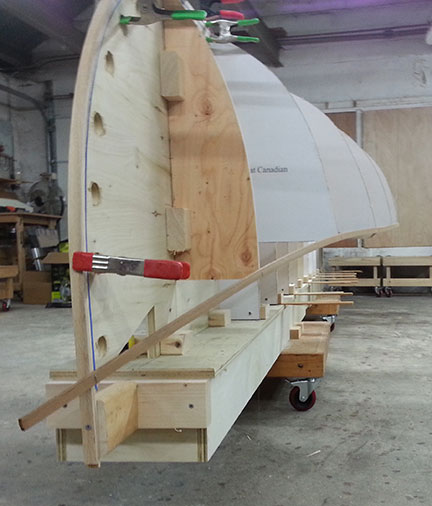
Getting to this point has been a good days work, and I was just ready to turn off the lights and leave the shop when the front of the boat caught my eye. This boat has a good deal of swing in an upward direction at the stem. I had to know before I turned the lights off if this was going to be a problem on the sheer strips, so I decided to put a strip on before leaving for the day.
As you can see from the picture, the bend went well, though it did need a bit of encouragement.
I should also note that this particular freighter canoe has a split form on the stem which is mounted with hot glue and buttress blocks in the same way that we would do any other boat.
The next steps will be to shape the stem and the transom and tape everything up to get ready to strip the hull.
SHAPING THE STEM AND TRANSOM
Now that everything is aligned and firmed up, we are almost ready to strip. There are just a couple of more items to take care of.
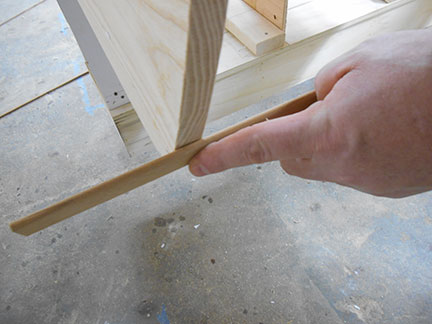
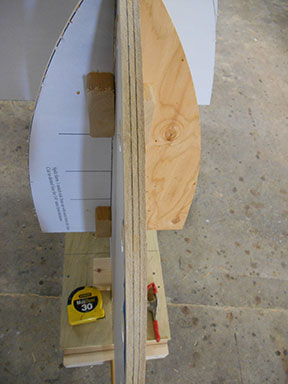 Shaping the stem whether it is for a large freighter canoe or a small solo canoe, the objective is exactly the same, you are creating a flat landing spot for the strips as they come around the bend of the body forms.
Before we can shape the stem, we need to make some registration marks where it is ok to take wood and more importantly, mark the boundaries where it isn't OK. The marks are different for different boats. For example, When we build dories here the stems are 2" thick and therefore the dividing lines are not going to be the same for a kayak or canoe which has a stem 3/4" thick. You should always refer to the plans to see if there are any special instructions on the dimensions of the stem and the bevels, however if there are none, it is safe to assume with out plans that you should divide the stem in thirds. You can see from the picture that the stem is indeed divided into three equal parts. I use a carpenters square which in this case is set to 1/4" depth and simply trace down the stem on either side with a good sharp pencil. You want to make sure your pencil is sharp so that the lines don't become so thick that it actually makes a difference in the size of the bevel. Remember that you are only working with 1/4". Now with the boundaries set, we can go ahead and bevel the edges.
 There are many ways to accomplish this, however for those of you who own one of our DVD sets, you know that I am not a traditionalist and am in favor of power tools when they fit the job. For me, I can take a belt sander and get the stem to shape in just a few minutes with a 50 grit belt. I will say this though that setting 50 grit paper on a belt sander will take wood quickly so make sure you are comfortable doing this before you put the sander to the wood. A good rule of thumb is to always keep the sander moving and never take your eyes off the wood while beveling. Keep the sander pointed directly at teh form prior to the stem. In the case of this freighter canoe, that means the split form on the stem form. By angling the sander to the edge of that form, it ensures that the landing will be just right for strips coming from that forms edge.
 So why is this important?, It may not seem like a critical thing to do with todays epoxies and exotic cloths, however, not having a smooth landing spot for your boats planking will cause either unwanted gaps at the stem, or worse a bulge in the planking as it approaches the stem. Either case is undesirable and easily avoided. If you are not comfortable with a belt sander, then use a wood rasp and just like the sander, point it at the preceding body form to get the angle. It may take a bit longer, but it is less stressful for builders not ready to pick up the belt sander.
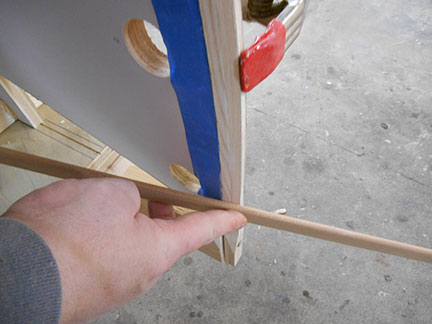
Checking your work is a simple matter of using a small strip of wood or a batten and push it up against the forms leading into the stem and the stem to see how it looks. If it lands flat with no spaces or bulges, then you have done what you needed to do.
Shaping the transom is necessary for a couple of reasons. First it is not the same shape in the case of this boat as the form prior to it and second and more importantly, it is angled at a 12 degree rake to accommodate the engine. Both of these things will necessitate shaping the transom so that you have flat landing zones. The process is accomplished the same way as the stem but the angles can be a bit trickier to follow. Just remember to keep your cutting tools, whether sander, rasp or whatever pointed directly at the form preceding the landing area and you will be fine. Above all, remember the cardinal rule of woodworking. You can always take more off, but it can be darn difficult to put it back on.
 One final note: I typically do not shape the entire stem or transom before beginning the stripping process. I typically do enough to get 20 or so strips on each side and them come back and do some more. This allows me to be more aware of the changing of the curves and to know exactly where the strips are coming from before they land on the stem or transom. It is easier to make small adjustments if you are doing smaller areas.
There is one last task to accomplish before you can begin to strip. Take some time and put painters tape on all areas the strips will com in contact with except the stem and the transom. You will be going through at least a gallon of glue on this project and you want to make sure that none of it is gluing the boat to the forms. If you put tape on all of the form edges, they will knock right out when the time comes. You also want to get some tape around the sides of the stem form where it comes close to the inner stem to make sure that the inner stem doesn't get glued to the stem form. There should already be tape on the edge of the stem form from when you glued up the inner and outer stem pieces, however if it was damaged in any way, be sure and get good coverage now or you will regret it when it comes time to pull the form from the hull.
STRIPPING THE FREIGHTER CANOE
 Well this is the part that most people want to get to. Understandable, this is the first point where you start to feel like you are actually building a boat. I could put a lot of text here to try to fill space for pictures, but that would be pointless for this boat as the stripping is pretty uneventful. So here are a few pointers to keep in mind.
If you have a table saw, then go ahead and rip the cove off the first strip. It will make it a little easier to align the strip with the sheer of the hull. If not, it isn't a big deal, just try to be consistent on the shear. The forms edge is pretty much a perfect curve so you want to make sure that you follow it. Any undulation in the curve for the first strip will be amplified and carried throughout the entire hull, so step back after the sheer strip is on, get on your knees at the stem and follow the curve around the hull to make sure it looks smooth. Better to fix it now than curse it later.
Make sure that your sheer strips hit the stem and the transom at the exact same height, and try not to glob too much glue on the stem and transom so that you don't have a big mess to clean up later.
 You will have to be gentle on the first few rows because there isn't much holding the strips in place just yet. This boat will have a painted hull, so there is little benefit to stripping without staples. If you want to strip your hull without the use of mechanical fasteners, we have an article to help you out with that on this site. We have a DVD which covers using staple-less construction as well as some advanced bending techniques for strips. It is for our Whitehall boats, however all of the information is directly transferable to this project. In fact there are a number of techniques we will be using on this boat which you can find in our Whitehall and Wherries DVD set.
Constantly check all along your strips to make sure that you have a good fit on your bead and coves. About every hour so, stop on the side you are working on and use painters tape as shown in the pictures to draw the strips tight together until the glue dries. That brings me to another point. You never want to get one side too far ahead of the other or you may begin to twist the stem or transom.
 Bottom line here is to take your time. A boat like this one may be large, but that actually makes it easier to strip than say a 10' kayak. The curves are wider and slope more gently. The real work starts on this boat when the strips are all on, so take your time and enjoy this part of the journey.
You should cut the strip ends off the stem and transom every few strips so that you don't catch them when walking around the hull. You will want a very sharp blade that will not tear at the wood and do not get impatient as it will just make problems you will have to fix later.
If, like me you own an oscillating tool there put a fine blade on it and let the tool do the work. It is fast and very, very accurate leaving no tear out as long as you don't push the tool through the wood and let the blade do the work.
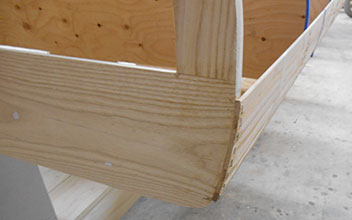
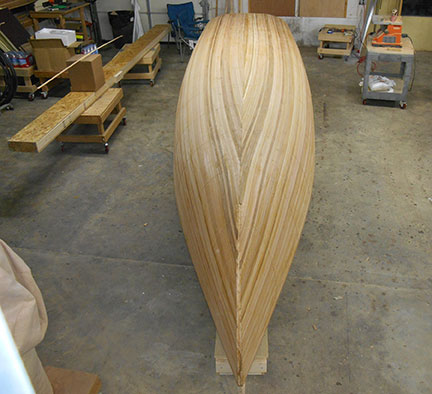
If you take a close look at where the strips meet the freighter canoe stem and transom, you will note that there are no gaps or bulges or empty voids. This is a sure sign that the beveling process went well and you should keep your eye on that as you go along.
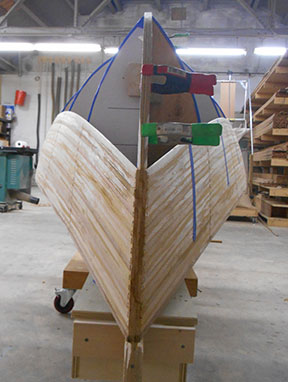
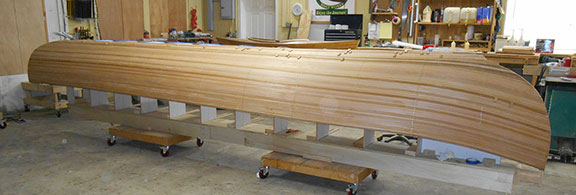
Here are a few more pictures for you. This shows the boat at 40 strips with about another 100 to go. For now it needs to rest and harden up so that I can continue to shape the freighter stem and transom.
MORE STRIPPING
I was almost hoping that there would be some special circumstance that would come up during the stripping of this hull, but the fact is it stripped up without a hitch.
The only things of note during the stripping to get to the point where one side was completely done was an area about 3 or 4 inches down the stem where the turn started to fight back just a little bit. For those of you who have our Whitehall or Kayak DVD's you know that you can use a heat gun and a wet rag to beat those strips into submission. We didn't feel the need to do that during this build, but if it starts to fight you a little too hard, 30 or so seconds with a heat gun should take care of the problem.
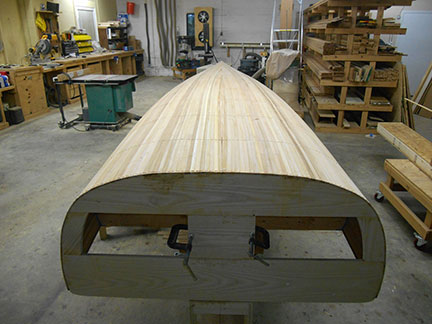
As you can see from the final pictures of this stage, we are lapping the strips from one side over the center line and then we will let that set and make our cuts. For this boat it is a waste of time to do any particular design on the bottom of the boat for three reasons. First, we will have a keel on this boat and second, the outside will be painted lastly, there will be a floor system put in the boat which will block any visibility inside the hull.
As a last note, I would add to make sure that you continue to put balancing strips on both sides of the hull as you strip until you get to the point where you are pretty much at the point where you expect to cut the notch for the outer stem. Then you can go ahead and strip one side right on through. This will make sure that your stem won't twist one way or the other.
CUTTING THE CENTERLINE & STRIPPING THE OTHER SIDE
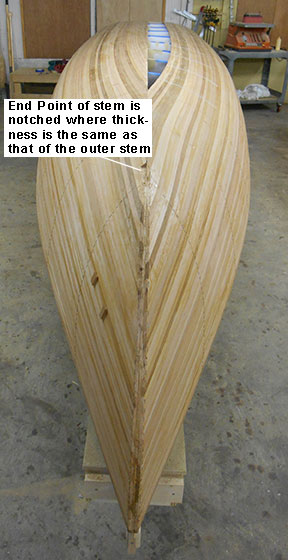 Well our freighter canoe is coming along just fine. I want to take a few moments here to try to describe the theory of where do you cut for the outer stem as it seem to be the thing that throws people the most.
In a nutshell there are are really only two things that you need to remember when figuring out where to make your cut for your outer stem.
- The other stem never (ever) goes past the inner stem. Depending on the shape of your hull, the ending point of the outer stem will vary greatly. In general the wider and flatter the bottom of the hull, the father down the inner stem the outer stem will stop.
- Second, the place where you make your cut should be at or as close as reasonably possible to the thickness of the outer stem. That is to say, when you cut the notch, the width of the nose of the boat should be the same thickness of the outer stem. In our case, the outer stem is 3/4" thick, so when we cut and flatten nose of the boat and measure across, it should be 3/4" or just slightly higher than that. If it is slightly higher, a light sanding or filling of wood flour and epoxy will take care of any small discrepancies. What you really need to be careful of is cutting it so high on the inner stem that not only is too wide, but the strip walls become so thing that you compromise the stem of the boat.
So, what is the best way to make sure you don't make a mistake. Easy remember the cardinal rule of boat building. You can always take more off, but it can be darn hard to put it back on. Take small nibbles until you see that it is widening out more than the width of your outer stem and then stop there.
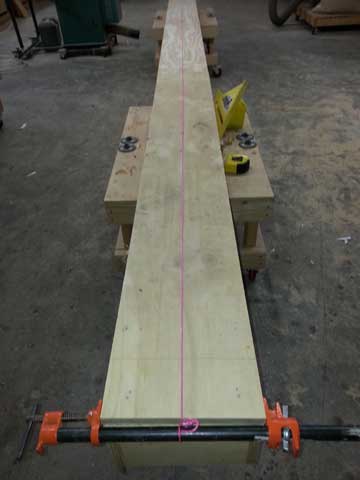
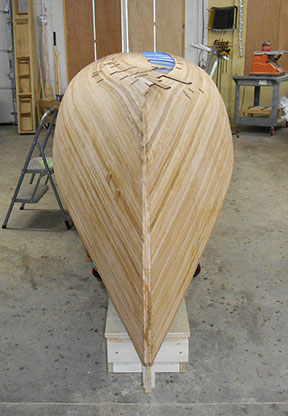
Cutting the center line of the hull was accomplished using a multi-tool with a find cut blade and a straight batten was temporarily hot glued down the center of the hull after a string was pulled to find the center line. Pull the string by putting a small finish nail in the center of the inner stem and the center of the back of the transom framing and pulling a taut string. By putting a batten on the line, you can run your cutting tool right along the edge for a perfect cut.
Once your center line is cut, it is a matter of backfilling all of the strips for the other side. There are some very specific techniques which are too detailed to get into here, however the DVDs cover them in depth. I will say this though. In many of these pictures you have seen an oscillating spindle sander in the background on a wheeled cart. In fact one of the is in the background of the above picture. These, or some kind of stationary bench sander will make for quick and accurate fitting of strips along the bottom of the hull.
Here is where we left the hull for the night. There are just about 10 strips left to go and we should be able to take care of that tomorrow.
LAST STRIPS IN THE FREIGHTER CANOE
 We left off the last post with just a few strips to go. Right around the time of the last post, I began to realize that the final strip was going to be long and thin. If you are looking to avoid this, then you cannot start at the sheer and work your way down. You will need to start by putting in a strip parallel to the strongback and then go back and fill in the stem and at the transom.
I don't recommend doing that really for this boat as it can get a bit messy at the transom. The last strip the way we stripped the hull was about 5 feet long and was about 1/2" at the widest part. Not really that big of a deal really, it goes in just like a shorter strip would go in, just work it a few inches at a time until you are there.
Most newcomers to this type of boat building will scrap a few attempts before they finally get the one they want.
 Patiences is called for here, however if you feel like the strip is too long and delicate to get in one shot, you can go ahead and give yourself a break and scarf the strip in the middle by putting a 60 degree cut on the end and a matching cut on the mating strip. Be sure and make the cut before you start to shape the strip so that you get good mating ends. This is a fairly common technique for people who cannot get strips the full length of a hull.
That last thing I would say is to not shape it too thin. You really shouldn't put the strip into place until you are ready to glue it down. Just shape it and test it enough to convince yourself that it will go in with a little persuasion. When you put glue on the strip it will slide in a bit easier as the glue will act as a lubricant.
If you are working alone, you may want to consider putting some glue blocks inside the hull and between the forms to keep the strip from pushing down through. If you have another set of hands at the ready, they can push from underneath while you push down from the top.
TAPING THE INNER STEM
 I realize that this step is something that not everyone does, however I am a firm believer that the 15 minutes that it takes to accomplish this step is well worth the time. I do this for every canoe, but it is particularly important for this boat. A freighter canoe is a a big canoe that will motor driven and regardless of our best most careful efforts, you will likely hit the dock a bit too hard some day on your way in from the fishing trip.
Before this boat is done, I will reinforce the stem in a number of ways. The issue is really any direct and forceful impact head on. When that inevitably happens you want to make sure that the only thing holding it together is not yellow woodworking glue. The problem is simple enough to plan for though. The first step is to bind the two sides together with a tape job of 10 oz e-glass down the front of the stem. We will also tape the inside of the hull when it is flipped as well as put on an outer stem for the freighter canoe and glass right up the sides of the hull and stem pieces which will tie it all together nicely. All of that combined with the deck which ties the two sides together gives a nice strong bind on what would otherwise be a trouble spot.
 For now lets tackle the first step which is the tape job. The first thing you need to do is sand down the bitter end of the stem and the strips to get a good flat edge. Be careful not to angle the end or round over the edges. You want to keep the surface flat and parallel to the end of the strongback. In fact use the end of the strongback when sanding the end of the canoe as a guide. I use a belt sander for this task, however if you are not comfortable with that particular tool, you can use any sander to get the job done. Just remember your objective is to sand a flat surface, not shape the stem. Any shaping should have been done by this point.
Hopefully when you shaped the inner stem before stripping you were able to get the angle right and now when it is all stripped up you are looking at a stem which is solid and has no gaps. If you have a spot or two where there is a gap between the end of the strip and the stem, then that needs to be taken care of now before you go any further. To fill the gaps in the stem, just mix up some epoxy and wood flour about the consistency of peanut butter and fill those holes, and when dry sand them flat.
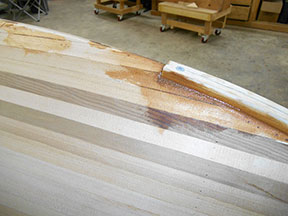
Once you have a stem with no voids, mix together about an ounce and a half of clear epoxy and with an acid brush or small chip brush. Now with a cut piece of 10 oz cloth about 1.5" wide and long enough to go from the end of the stem to where the bottom meets, use a gloved finger to spread the cloth onto the boat stem. Now gently take your brush and add clear epoxy all down the cloth. Not too much, just enough so that you can use the gloved finger again to spread it all along the cloth. Be careful not to get epoxy on the hull and if you do, wipe it up so that it doesn't dry there.
APPLYING THE OUTER STEM
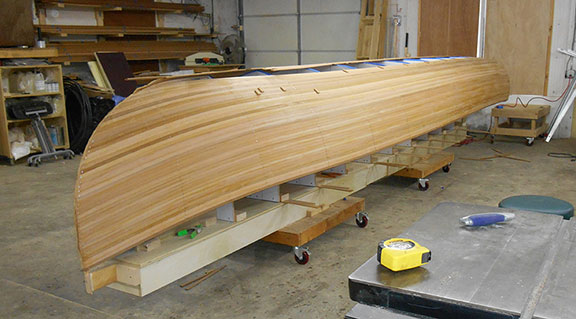
Now that all of our strips for our freighter canoe are in place and the stem is ready to be worked, we can go ahead and do the finishing touches to make ready for applying fiberglass to the hull. Before we move on, you will need to have rough sanded the hull using 80 grit. Rough sanding will expose any issues that will need to be addressed. Be very careful of that now hardened tape on the stem of the boat. The edges are very sharp. You can trim that up with a razor knife and finish it up with the sander hitting the edges. DO NOT run your fingers down the edges until you have done this.
 We need to dry fit and then permanently apply our outer stem and fill any imperfections in the hull. Having done so many of these and not wanting to waste any epoxy, I typically like to apply the stem and then use the rest of the epoxy to fill any voids.
In order to apply the outer stem piece to our freighter canoe we will first have to dry fit it. DO NOT skip this step. It may seem silly to you, but it is much simpler to fit and place your stem piece when there is not epoxy dripping off the back of it.
First, if you have not already done so, go ahead and sand with a coarse sandpaper the inside and sides of the outer stem. The inside needs to be clean but roughed up for good adhesion and the sides are much easier to sand before you put it on the hull.
You will have to pre-drill all of your screw holes so that you don't crack the stem when putting it on. I typically put my first hole about 1" from the bottom of the hull and then every 6" after that until I get to the sheer line of the boat. Start by getting your carpenters square and setting it to 3/8" depth and draw a center line down the outside of the outer stem and measure and mark your screw hole locations. Before you drill anything put the outer stem up against the hull and be sure that your second to last hole mark is at least 2" below the sheer line and the last hole is at least 1" past the sheer line. This will allow you to hold it tight while making sure you don't have a screw hole pop up when you flip the boat and begin your trim out. Once you are happy with the location of the screw holes you can use a punch to start the hole and then drill them out with the appropriate drill bit.
A couple of things to keep in mind here. First off, I do not like to ever leave mechanical fasteners in a boat which server no purpose. The only purpose of these fasteners are to hold the stem in place while the epoxy dries. Because of that there is no reason to countersink them and the drilled holes should be comfortably large so that there is no chance of splitting the freighter canoe stem piece. These screws will be taken out after the epoxy is dried, so use a good quality, strong steel screw. A good deck screw will do the trick. Cheap screws have a tendency of spinning off the heads and leaving the shank buried in the wood when epoxy is involved.
 Now go ahead and screw the outer stem into the inner stem using 1 1/4" screws but just snug them up, don't crank them down. Be particularly careful to keep the stem centered as you are screwing it down. There is a couple of reasons to dry fit. First to make any mistakes before you apply epoxy and second, the screw holes you make now will act as a guide when you finally do screw it down with epoxy.
Now back off the screws and you should see a nice line of holes down the inner stem. The screw will have made a small mound at every hole, so just take some 80 grit and sand that down flat again. Now it is just a simple matter of mixing up some thickened epoxy about the consistency of a yogurt and applying your stem. Before you thicken it though, brush some clear epoxy on the inside of the outer stem and give it a few minutes to let it penetrate. While that is happening, go ahead and add your wood flour and paint about a 1/16" layer of epoxy all along the inner stem of the boat. Now go ahead and screw that outer stem back on there. Again, the holes you have already made should guide the stem right back down to where it was dry fit. There is no reason to over tighten here. If you do you will likely either strip the hole or crack the stem, so just snug it up until you the epoxy oozes out all along the edges.
Now with a gloved hand, spread the filler that oozes out all along the edges to make sure there is a smooth transition from the hull to the stem along its entire length. If done correctly, the fiberglass will flow smoothly from the hull right up the side of the stem.
Any extra thickened epoxy can now be used to take care of any flaws you may have found on the hull of the boat while rough sanding. Unless you were darn lucky this will at the very least include where the final strip was put in and any places where there may have been chip out of a cove. If you used good quality strips there shouldn't be too many places to take care of.
AN UNEXPECTED TWIST
 So here is one we didn't plan on but rather than just having you guess about what happened, I figured I would share with you what is going on.
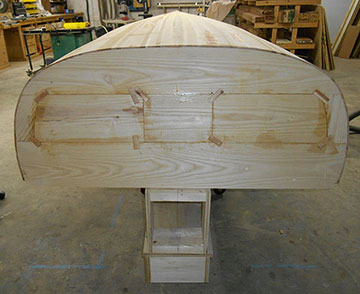
This particular boat we are building will be going to a gentleman in Texas and he asked us to make the transom framing into a solid structure. This is purely a matter of taste. Traditionally, the transom on a freighter canoe would have been framed out, however most modern hulls are solid plywood. Well we aren't using plywood anywhere on this boat other than the strongback and the framing of the transom is Ash.
No worries, just need to fill the holes. We know from our freighter canoe plans that the holes are exactly 7" tall, so it is a simple matter of cutting blanks that are 7" tall, holding them up to the holes and tracing from the inside the curve along the edges. A careful cut along the lines and a light sanding you you have perfect fillers.
Gluing is a bit tricky because there is virtually no way to clamp them in, however remember that we will be planking over the outside of the transom. On this particular hull we will be using Sapele for that. Because we made fillers with a good snug fit, we can simply paint thickened epoxy along the edges of the framing and fillers.
The only trick is how to hold them in their proper place. For that, we put some glue blocks on the inside of the holes held in place with hot glue and exposing tabs to stop the fillers from falling through or even moving for that matter. Once the pieces are in place, we attached more glue blocks to the outside to hole them in and keep them from inadvertently pushing out.
It is well worth your time to get up underneath there and clean up any epoxy which will seep through as well as the outside. As with any epoxy job, it is much easier to clean up than it is to sand up.

