Building the Nantucket Sleigh
I had been thinking about building a solo canoe for some time now. We build a number of new designs here every year, and it has been a while since we have done a double paddle canoe. Over the years, we have been asked if the Little Rob can be made smaller in size. Although it is possible, it really wasn't desinged for that. What we needed was a boat that was smaller than the Little Rob but something more substantial than the classic Wee Lassie. I have nothing against the Wee Lassie and have the utmost respect for it's desinger (Henry Rushton), but it is a petite little thing and not suitable for most people. The little Rob is a nice boat but it was larger than what many people need.The Nantucket Sleigh is stable enough to fish the bays and harbors for Bluefish but light enough to stick on a small car roof, and built in your dining room if you can get your housemates to agree to it.
The boat ,when done it is just under 12 feet long, 9" deep and will weigh about 25 lbs. Sounds perfect for what I am looking for. I go about 200 lbs which is in range for this boat.
I would suggest that if you are going to build this boat that you get the full set of plans with the patterns and above all the DVD.
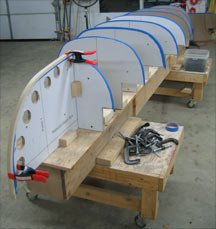
Setting up the building jig and canoe forms
 I spent a few hours during the week cutting out the forms and getting the stems ready so that I would be ready by the weekend to put in a couple of good days.
As I had done this before, everything went quickly. In the canoe plans package I got, there were full size patterns which makes the set up process very fast. In a nutshell here is what happens on day one.
Make the forms. If you have patterns, this is a simple matter of getting some 3m spray glue and a couple of sheets of MDF (or plywood if you prefer) and adhering the patterns to the MDF. Take some time to lay them all out first so you don't waste too much and have to get another sheet. For this boat I was able to get them all onto two sheets at a cost of $20 per sheet.
Once the patterns are down I cut them out using a jig saw. the DVD shows you screwing the two sheets together so that you can cut out two of each form at the same time. One mistake I made was doing this for the center form and there was only one needed. Had I been thinking I would have known better. Then I mounted the forms on the strongback as shown in the plans and all went well. So far, no surprises, everything according to plan.
Gluing up the canoe stems
 Let me start with an admission of guilt, here. I took pictures while I was doing this but they did not come out well so suffice it to say that I did them exactly as shown in the DVD. The only difference is the form. there are a couple of different ways to make these. The DVD has you build a simple wood steamer using a tea kettle and a piece of pvc pipe. Instead of a tea kettle, I use a wall paper steamer that I got from Home Depot for $50 and it works great.
Some people argue that you don't need to steam them that you can simple cut the pieces thinner and they will bend without breaking. There are positives and negatives to this method. On the positive side, you don't have to wait till the wood dries before you glue them up saving a little time but not much. The last thing I did on day one was steam the stems and I snuck an hour during the week to glue them up. The downside, and this was a big one for me was that with the additional pieces because of the reduced width, it was a bit more unwieldy gluing them up and keeping them all in line with each other. I can see it both ways though, I just prefer to steam them.
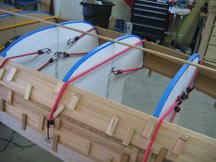
Stripping the Canoe
Day One
 I have put in about 10 hours building this boat to get to this point. I was looking forward to putting some strips on the hull. I decided to build this boat without using staples. it takes a little more time and I was concerned about that so I called the guys at Sandy Point and asked for some tips. they were great as always and sent along some pictures and techniques of how they do it so that they don't have to stop after just a few strips. It involves hot glue, bungee cords and various other gadgets that are easy to make or come by. It all worked out great so far.
You can find an article on this site on how it is all done.
It took me about 8 hours this weekend to get to where you see in the pictures. I put on about 25 strips which is close to half the boat. Because I am not using staples, I stopped after about 16 of that to take a long lunch break and give the glue a chance to dry. After about 1 1/2 hours I was able to take off the bungees and start up again.
After about 24 strips, it started to get too difficult to hold the strips down and keep adding more but it had been a full day so it was time to wrap it up. I put bungees everywhere...
Stripping the canoe
Day Two
 There was a warning on the canoe plans that there was a tight corner near the top of the stem and they weren't kidding. the next 10 strips were challenging, but not impossible. I am sure I could have done it myself if I were using staples, but because of the tight curves and the fact I was not using staples, I called a friend to help me hold them down while I put them in place. Because of the stress of the curve I was only able to put 12 strips on in the same time it took me to do the first 25.
I took an hour break after every 4 strips to give the glue a chance to setup. I did break 3 strips bending around this corner so if you build this canoe, remember that the trick here is to pick strips without too much long grain for these strips and ease the strips in. I didn't need one, but I have read that using a small hand steamer will help with particularly difficult strips.
Truth be told, I passed that time with a good friend and a six pack so it was a good day.
Stripping the canoe
Day three
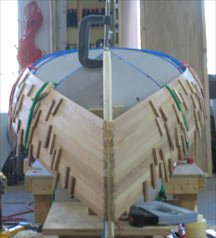
 Apparently I got past the "tight curve" they were talking about in the plans because we were off to the races today. I had my buddy come over just in case and enjoyed the company but the stripping was stress free. In fact with another set of hands to help it went really fast. We managed to strip all the way up the stem and one complete side of the bottom before we wrapped up for the day. The only thing left to do is cut down the middle and fill in the other side.
I have tried different patterns on the bottom before but this is the simplest way. fitting the strips is easy once you get the hang of it. When the glue dries, it takes about 10 minutes with a jig saw to mark and cut a straight line down the middle of the hull and you are ready to start stripping again. Generating a line down the center of the hull can be done a number of ways however I have found that a tight string from stem to stem is pretty much perfect. Once the string is good and tight you can make some tick marks so that you can use a straight edge.
If you use a jig saw to cut the line, remember the forms are there, so go slow so that it doesn't jump on you when you hit them. And be sure to use the right blade.
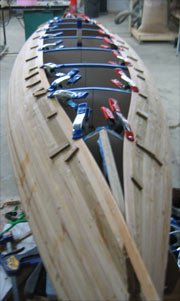
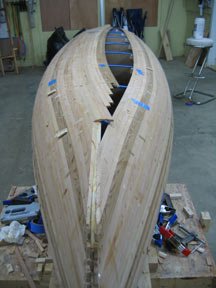
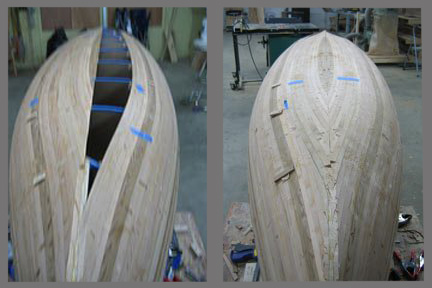
Putting the last strips on the hull
Took a full day but I managed to get the entire hull stripped today. I have to say, that when I went back and added up the time spent stripping the hull I was surprised at how quickly it went. I am about 30 hours into the project and the hull is completely done. I know from previous canoes that it is going to go really quickly from here.
I will say this though, in the DVD, they use a bench sander and say it is a nice to have but not necessary. Well for the money you spend on a simple bench sander it is well worth the money. Saves a ton of time but more importantly, it gives much better results than fitting every strip using a knife and block plane. Taking 1/16" off the end of an otherwise good fitting strip takes about 2 seconds with a bench sander.
Break out the MP3 player and sand, sand, sand!
 This boat was actually a snap to sand as it is much smaller than most canoes.
It took about an hour to get the rest of those hot glue blocks off the canoe and 2 hours of pretty constant sanding with breaks for numb hands. The music player helps. 2 hours is just a couple of albums worth of music. You have to take your time getting the glue blocks off and make sure you do it gently. If you just start ripping away at it you may tear the wood underneath.
Still plenty of time left in the day so I cracked out the fiberglass and epoxy. (no time like the present)
WOW, this boat came out great! When that fiberglass went on it came to life. those tight curves that gave me so much trouble were well worth the effort.
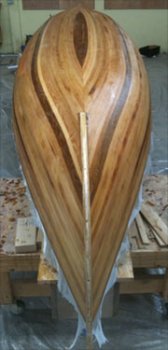
Went back the next day and put the stems on the canoe and snapped a couple of pictures. Next weekend, this boat gets flipped.
1-2-3- over she goes
 This project seems to be going very fast. I am three weekends into this and I think I will be in the water in a couple of more.
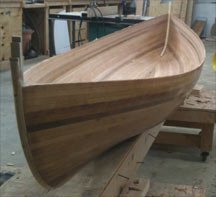
I turned the canoe over on its jig today and it weighs nothing. I am guessing but i would be surprised if it weighs more than 15 lbs. I imagine by the time it is done it will come in at less than 30 lbs, seat and all. Still haven't decided on what to do for a seat. I don't want to sit on the bottom of the canoe but I do want to stay low.
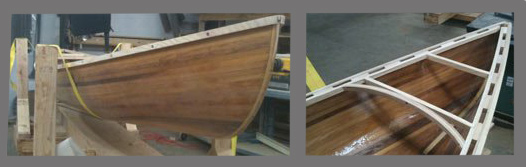
Spent about 3 hours sanding the inside of the boat today. You have to hand sand near the stems so it takes a bit longer. I am very happy with the way that it turned out. This left plenty of time to fiberglass the inside and make up the decks. The boat plans call for decks instead of the normal breasthooks you would put on a canoe. I have never done this before but the canoe building DVD seems to be pretty clear on what needs to happen so I will just push along.
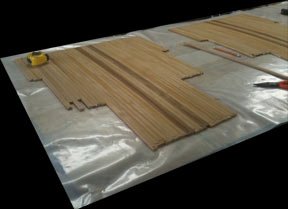
the decks are simple enough to make, just lay the strips out on a plastic covered table, glue them together, sand, fiberglass and flip them over and glass the other side. This takes 3 different trips to the shop because of the drying time so don't wait till you need them to make them up.
Time for the trimmings.
I am using scuppered gunwaleson this boat. Again, I don't want a long blog entry on how to make these so there is an article here on this web site on how to make scuppered gunwales for a canoe. I noticed from watching the DVD a couple of days ago that I was going to need curved deck supports if I wanted my decks to be like those in the canoe plans so I snuck into the shop last night to get them ready. They were real easy to make and because there wasn't much of a curve, there was no reason to steam them. They took all of about 30 minutes to make. because I had everything I needed, I was able to get the inner and outer stem installed as well as the deck supports all in one day.
I used Gorilla glue on all the joints. It is waterproof and fills all the gaps really well. Takes a while for it to dry but you need to stick around for a while to make sure it doesn't drip onto the boat as it starts to expand. You should definitely where gloves while using this stuff if you have them because there is no washing it off.
It is amazing how fast this boat is going. I am already thinking about doing another one. Sometimes I swear that I like building them more than paddling them.
OK, not funny. Big day though, once the decks are on I am down to varnish and seats
Let's get the deck out of here
 Fitting the decks was easy enough. Just put the blanks you made on the boat and trace around with a pencil for a rough cut. Cut 1/4" proud of the line to make sure there aren't any Uh Oh's. Because the decks are only 1/4" thick, they will sand down to the final shape easily once they are installed.
I don't want to use any screws on the deck so I simply buttered up the supports and the bottom of the deck with epoxy and used every spring clamp I had before I ran to home depot to get 20 more of them.
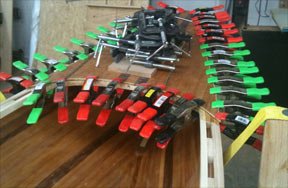 I know there are a lot of people out there that say you should use Cabosil for gluing with epoxy, but the DVD from Sandy Point suggest using wood flour. I called them on this to find out why and I am glad I did. It stopped me from making a pretty big mistake. Cabosil dries white while the wood flour dries looking like wood. If I had used the Cabosil it would have really stuck out when I varnished the boat and I would not have been a happy camper. that phone call was definitely worth the time.
This was a pretty quick day in the shop, the whole process took about an hour and I can't really touch the boat until tomorrow when it is dry. If I had known it was going to be this quick, I would have snuck out here at night to do this part. Looking good though, I am happy.

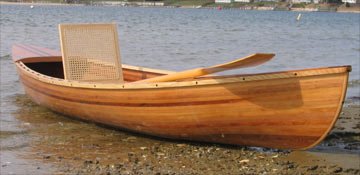
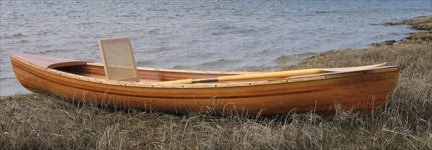
And into the water she goes.
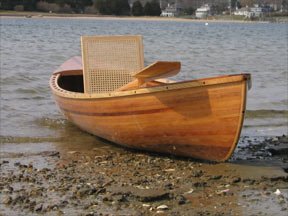 Holy mackerel am I happy with this boat. I took a good deal of time varnishing this boat because it came out so well. There are 7 coats of varnish on the hull and it is like glass. The only woodwork I had to do when I took the clamps off the decks was to put a small decorative trim on the front of the decks and some final detail sanding. I did end up using 3 little brass screws on each end of the boat to secure the deck trim.
As for the seat, I decided to order one of the folding seats from Sandy Point because I like the idea of beaching her and putting the seat on shore and while making a few casts.
It took no time for me to bring it down to the bay for trials and I could not be happier. This boat is exactly what I was looking for. Here are some final pictures, which don't do her justice. I am sure this canoe and I will become very best of friends.