Lofting Basics
The Basics of Boat Lofting
Introduction
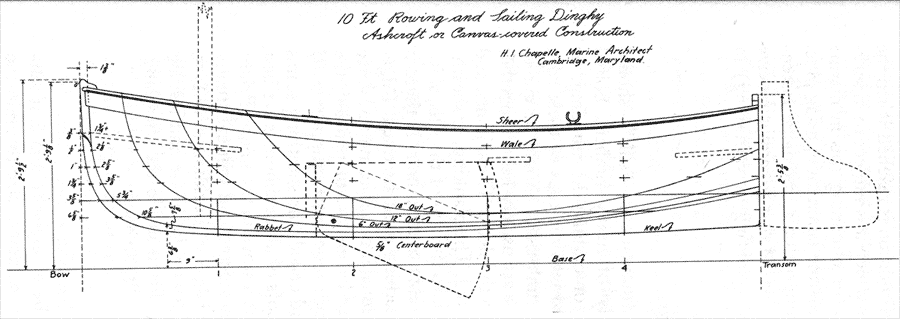
First, let me make it perfectly clear that the vast majority of the boats on our site are lofted for you and full size patterns are provided. There are very (very) few boats on our site that require lofting. Boats such as the tug boat would require a massive printer to print out patterns, and even if we could, using them would be rather impossible. In theory, if you are prepared to take on a project the size of the tug boat, you should be able to loft as it will be invaluable in the actual building process.
Let's get a piece of house cleaning out of the way first. The correct term for one who lofts is a loftsman. This person is defined as one who creates patterns or frames. For the purposes of this document, so as not to alienate all of the very capable woman in my life, I will refer to this person as a lofter.
I admit that lofting is something that I take for granted, simply because I know how. What seems simple to me now was once a mystery and a frustrating one at that. It seemed like every book I read left just enough out to keep me scratching my head. Like any good puzzle, if you look at enough pieces the picture starts to come into focus. over the last 25 years or so I have undoubtedly lofted a couple of hundred boats some were for packaged plans, some were for customers, some were just for fun.
That's right, I said it. I loft for fun.
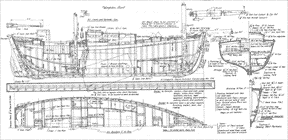
The basic problem with getting information on lofting seems to me to be an issue of the times. When I purchase a modern boat building book, the section on lofting seems to be a bit light on information as to the specifics of their lofting technique. The omitted baseline information or stem configuration or any other number of small details seem to be the norm. It is also a sign of the times that most of the boat building books of the day are written and distributed by people who have business that sell plans and patterns for the same boats in the book. My cynical mind tells me that one has something to do with the other. On the other hand, there are some excellent boat building books which have chapters on lofting, however most of them are going on 60 or so years old and few but us hard core boat building junkies still read them. These books go back to the golden age of wooden boat building when seeing a home built boat on the water was at least as prevalent as a "store bought boat". The only issue that I find with these books is that some of the examples given within the text is typically more involved than the home builder will get involved with.
Becoming competent at lofting will open up an entire world of boat designs that would not otherwise be available to you. The best example I can give of this is boat building magazines of the last hundred years or so where it seems like countless tables of offsets ( also called lofting tables) for historic and geographically specific boats were given. Most of these boats excellent in both form and function and as good (in many cases better) than the boats you find today. I can't tell you how many times I see a "new" design which looks a whole lot like a design I have on my bookshelf from 50 years ago.
There is absolutely nothing wrong with taking an older design and making it new by lofting it and converting the building method to use new methods. Good boat designs were made to be built. 50 years ago, there was no epoxy, fiberglass was rare but coming on strong. Though I am not sure who invented epoxy, without a doubt, the Gougeon Brothers (founders of West System) did more to advance its use in the boat building world than anyone else I can think of. The onslaught of epoxy changed everything about boat building. Options for building a boat are now plentiful and at times confusing for the home builder. For example, a small rowing craft can be built in wood strip, stitch and glue, lapstrake, carvel planked or cloth over frame. Each boat coming from the same original design. The one thing they all have in common is they need to be lofted by somebody.
The History of Lofting (you need to know this)
There are a couple of things to know about lofting before you learn to loft. One fun fact is the origin of the term lofting. In days gone by (before computers), lofting needed to be done near the boat building effort as the builders needed to frequently check lines and measurements. Because the building site was both busy and dirty, lofting the boat on the building floor was far from perfect. Most of these boat shops did however have lofts in them where the drawing typically took place. You can probably see where we are going with this. The term of lofting originates from the location it was practiced.

The next thing you need to know is how the numbers are represented in a table of offsets. In the table of offsets you will typically see entries for half breadths, depths, profiles and sheers and they are represented by numbers that look something like this. 38-2+ or 3-2-2+. both of these number represent the same distance. they are 38 5/16". Offsets are read in either inches and eights with a plus sign indicated to add a 16th of an inch or feet, inches and eights with a plus sign for indicating an added 1/16". Typically it depended on the size of the boat as to whether or not feet were used and each designer has their own preference, both methods yield the same result.
If you are wondering how this method of lofting was settled on, it is simpler than you think. First, when boats began to be lofted, the imperial numbering system was most prevalent. The metric system, though invented in the late 17th century, was not adopted as a standard unit of measure by any country until 1795 when France adopted it as their standard measuring system. Great Brittan and the United states which are arguably the two largest ship and boat building countries of the last 200 years did not adopt the metric system until the mid 1960's and in the U.S. it is typically only used in scientific fields. By that time many a boat had been designed, lofted and recorded and there is little urgency to change a system which has so much history and works so well. Remember that boat designs are not meant for one geographic area so unless someone gets the urge to re-loft and re-publish the thousands of boat plans already published, the system is in little danger of being toppled. More importantly, you would be doing yourself a disservice by not learning the measuring scheme as there are so many boat designs published using the system.
If you are wondering why the + sign for 16ths, it's simple, measuring devices were not accurate to a 16th of an inch in the 18th century, so they were happy with just saying "a little more than an 8th"
The Essential Terms
Many people get confused at where the line is between boat building and lofting and there is good reason for this, the two are interdependent. You cannot loft a boat without knowing something about boat building and you cannot build a boat unless someone has lofted it out first. As an example, you don't need to know how to mount a sheer clamp in order to loft, but you sure need to know what it is if you are going to loft it. Little wonder why pretty much all small craft lofters are also small boat builders.We will use some boatbuilding terms as we go, however the essential terms for lofting are actually very few.
We should start with the views. Boats are lofted in 3 dimensions, 2 dimensions at a time. There are 3 views, each view giving two dimensions. Each of these views could be mapped to the Cartesian coordinate system, however historically neither the X,Y or Z axis has been assigned to any view. In using newer CAD systems, however it is required to assign a planes to each view and I imagine that different designers assign different planes. When I loft, the frames view is the X-Y plane, the Profile view is the Y-Z view and the Plans view is the X-Z view. Don't get too hung up on this concept as it is not even relevant unless you are using a computer to loft your boat and if you are using a CAD system, the concept is probably not foreign to you.
Now let's describe the views.
 Plan view: This is the view of the boat looking down from the sky. traditionally the plan view has two halves. On one side you will see the lines of the boat. the lines in this view are the waterlines, the sheer, the centerline and the frame spacing if there is one. On the other side of the plans view you will see what is basically a sketch of the boat. This is where you will see the deck layout, seating, engine well or other materially important items the designer or lofter deems necessary to give the builder a perspective of the boat.
 The Profile view: The profile is exactly what it sounds like. If the boat was suspended in mid air and you were looking at it from the side, you would be looking at the profile. So another way to say profile view is to call it a side view (but don't). In the profile view you will typically see the sheer line, the profile line (which is the line describing the bottom from the transom to the stem tip), and buttock lines.
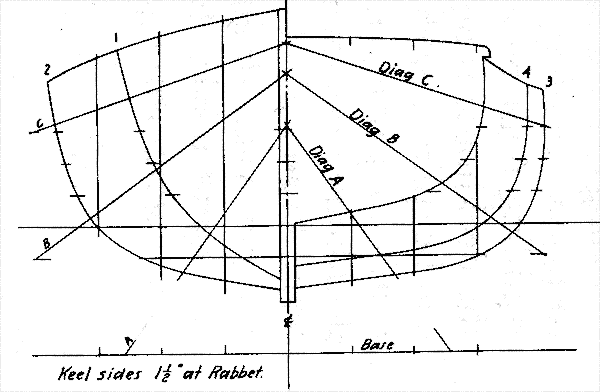 The frames view: This is sometimes called the forms view. This view is the view of each sectional frame as viewed from the front or the rear of the boat. If the same boat were suspended in mid air and you were looking from the transom forward or the transom back you would be looking at the frame view. It is called the frame view as this is the view that is used to "pick" the frames from. That is to say it is the view which you can create patterns for the frames or building forms for your boat. If you know the size of the stock of the building frames (which should be on the boat plans), and you have the outline of the frames from the frames view, it becomes an easy task to create patterns for your frames.
Each view has specific lines which need to be lofted in order to create an accurate view of the boat.
Assuming we are lofting a round bilged boat, the profile view needs to have 5 items lofted. The buttock lines, the sheer line, the profile line, the transom line and the stem line. Some designers combine the profile line and the stem line, however they are typically not integrated as the stem of the boat needs to be transformed into a frame member unless you are building a stitch and glue hull.
So let's define what each profile view line is.
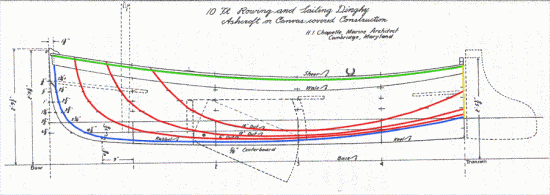
The sheer line (shown in green) is the line which describes the point at which the hull ends. At this line either the boat is terminated with a gunwale or the deck begins. If there is a deck it is also lofted out as it will need support members.
The profile line (shown in blue) is the bottom of the boat hull. There is a distinction between the bottom of the hull and the bottom of the boat. There are items which extend past the hull bottom such as skegs and keels. Though these need to be lofted out for the building process, they are not technically part of the hull lofting. These parts of the boats need not be described in the lofting table, though you may see them there as part of the designers convenience. Typically they are described in the boat plans.
The stem line (also shown in blue from first frame forward) is the curve described in the table of offsets which specifies the curve of the stem from some given point on the profile line to the sheer line. The designer will give enough points in the table of offsets to accurately manufacture a stem frame or what is more commonly simply called the stem.
The buttock lines (shown in Red) are lines which when viewed from the profile view appear to be slices of the hull which are parallel to the centerline of the hull. These points in conjunction with the waterlines give enough information to fair all the curves.
The Transom line (shown in Yellow) shows you the rake of the transom as well as a perspective which allows you to "extend" the transom if it does not mount parallel to the rest of the boats frames. This also assumes that your boat is not a double ender or a boat with two stems.
Because the plan view is a different perspective, it stands to reason that we will be lofting different lines or in some cases, the same lines from a different perspective. Consider the sheer line. The sheer line is viewed in all three perspectives, the plan view, profile view and the form view. However, because we are observing the boat from three different planes of view, the information given from the sheer plotting in each perspective will give us different information.

In the Plan view, the plot of the sheer line will show us how wide the boat is at the sheer line, in the profile view, the sheer line will show us how deep the boat is from the gunwales to the profile or the bottom of the boat. Finally, in the frames view we will see the compound curve from the stem to the transom or far stem.
The lines of the plans view are as follows:
The water lines, the water lines shown in the graphic in purple act much as the buttock lines only in a different perspective. The waterlines slice the boat from the bottom to the top. Lofting the waterlines allows you to ensure that the hull has no bulges or hollows at any intersection of the hull from the gunwale lines to the bottom of the boat. Using the term water line is a bit misleading. they are simply lines drawn up the hull theoretically paralell with the actual water. In reality, an actual waterline will depend on the amount of displacement not only of the hull but the weight of the items in the boat at the time. As for them being paralell, that again will depend on the dispersement of weight within the boat. For the purpose of lofitng, it is important to have mesuremenst from some controlled and imovable base line, so in lofting, the waterlines are actually lines moving up (or down if the boat is being lofted upside down) the hull from the baseline. As discussed, the sheer line is lofted which will give you the breadth of the hull at any given point.
Finally, if your boat has a transom, the transom lines will also be lofted in this view showing the length of the hull at both the sheer line and bottom of the hull as well as the transom breadth at any given waterline. If the transom sits at a 90 degree angle with no rake, these there will only be one line.
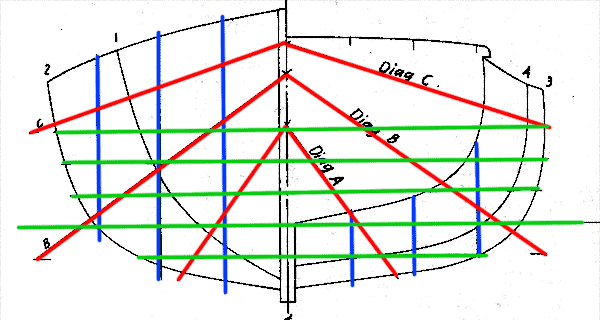 Lastly, there is the frames view. For me, this is the view which tells the entire picture. All of the lines are lofted in this view. The water lines and the buttock lines appear as a grid in this view, however each frame or form is lofted in this view. The frames are slices of the boat at given intervals starting at the transom and working forward to the stem of the boat. If your boat is a double ender then the stern of the boat is a point just as the stem in this view is a point indicating the place where the sheer line meets the profile line.
This boat has a transom with a good bit of rise aft. If you look again at the waterlines in the plans view, you will see that as the water lines get lower on the boat, they turn in on the hull. If you look at the frames drawing on the left, you will see that the lowest water line never reaches the transom. There is one more set of lines that we should discuss. they are called diagonals. Diagonals are typically only drawn in the frames view and serve the specific purpose of filling in the blanks. They are not necessary for the lofting of the boat, however, depending on the hull shape, they are necessary for picking off points to create frames. They are also at times lofted in the plans view just as another verification of a fair shape to the hull, however little information other than that can be derived from their lofting in this view. Because of the curves of some hull shapes, the water lines and buttock lines can sometimes leave blind spots on various frame locations. These lines are defined as starting at an arbitrary point typically above the boat on the centerline and a second point given for each diagonal usually defined as an intersection of a water line and buttock line. however, at least as far as this lofter is aware, any rules for the defining of the two points necessary for the diagonals. They simply need to accomplish the need to fill in points on the frames that are not otherwise defined by the waterlines or diagonals.
Boat building vs. Boat Lofting
That pretty much describes all of the components to a lofted boat. Now I know that you may be thinking, but what about the gunwales, knees, keels, keelson, battens etc, etc, etc.......
I told you in the beginning of this that there is a difference between boat building and lofting. Lofting is an effort to define a hull. the rest of the stuff is about how the boat is built and what is needed to make that happen.
Before you jump all over me for that statement, let me give a couple of examples.
If you are lofting a boat stem, are you lofting it for a Laminated split stem which has an inner and outer stem, or are you using a traditional stem with a stem foot and sawn lumber. Is the stem on piece so that you need to loft the rabbet line? Or is this a stitch and glue boat in which case you don't need to loft the stem piece at all because there isn't one.
So understand what I am saying here. I am not saying that a good lofter will not be able to both draw and pick off such items as stem details, , batten locations, transom knees and so forth. What I am saying is that these things are not necessary for the purposes of defining the hull shape and for picking off the patterns for the molds or frames, which of course is the job of the lofter. Once the hull shape is defined, and presuming that you know how the boat is to be built or at least the methodology which will be used to build the boat, then you can add such detail to the drawings as to convey instructions to the perspective builders. In the case of a plank on frame boat you will want to add battens, knees, stem configuration, transom framing, skeg, engine bedding, floor supports, bulkheads and on and on. In the case of a stitch and glue boat you will want to give panel expansions, bulkheads and their locations, specific locations of any structural members and seating arrangements which are typically all part of the structural integrity of a stitch and glue hull.


