18' Great Northern Freighter Canoe - Transom Jig and Strongback
THE TRANSOM JIG AND STRONGBACK
 One of the great things about being an active boat building shop as well as supplier of plans and patterns is we get a real good sense of what we can supply to our customers which will make the build easier. One of the things we noticed here was it was far simpler for us to design a jig to hold the transom of the boat on the CAD system than it was to do it in the shop my measurements. I was skeptical at first that the jig would be accurate enough when we started this, however it has worked flawlessly and we never start a boat that has a transom without one of these jigs.
In days past, it was typical to build a generic support system with an angle to it and you would slide the transom or transom frame up and down and left and right until it aligned to where you needed it to be. Now we take all the measurements on the computer as we loft out the boat and design the jig with full dimensions. It is basically a platform at the right angle and set at the right position so that all you need to do is set the transom on top of the platform, center it and use either hot glue or temporary screws to hold it to shape.
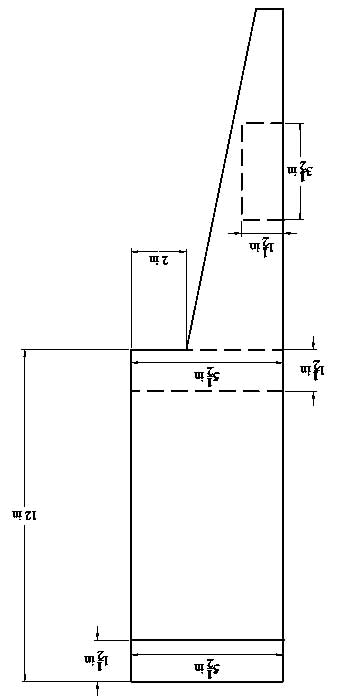
The plans will have a diagram which looks something like the one that you see here. with the side profile outlined with full dimensions as well as reference to the cross members needed, where to put them and how wide they need to be. We give all of the dimensions on the patterns pretty much to check your work, however, these are made the same way that the boat forms are made by gluing them to the base wood and cutting around the lines.
The materials for these jigs is a good quality, straight piece of 3/4" stock. We typical use a decent plywood for this. The spreaders we design so that they can be standard 2 By stock so that you don't have to go looking for something or mill special pieces of wood. For this jig, a couple of 2 by 6's (or more preciously 1.5" X 3.5") and a 2 by 4 (or more.....you get the idea).
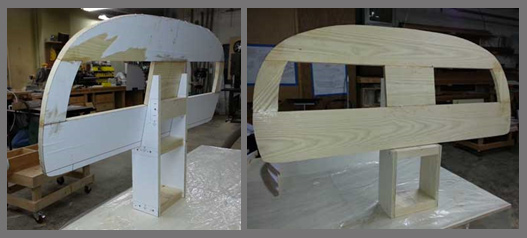
The jig needs to be solid and square so that everything aligns. Typically we use a stapler with 1 1/2" staples to get it together and then sink some 2" screws from the sides into the cross members. If you cut with care and build it square you will find the jig gets you right to where your transom needs to be. It has never let us down. Here are a couple of pictures of a finished jig.
Well be needing a place to put all of these forms soon, so next we will get our strongback ready. Any of you who have seen one of our DVD's have seen us build one of these so I won't get too deep into how they are made.
 Strongbacks need to be strong, straight and not susceptible to warping and twisting. The best thing we have found for this is 3/4" plywood. The plans for any of our boats have specific measurements for the strongback, so we will avoid those here so that people don't get confused. Any of you who have built our boats before, know that we make our strongbacks in sections that slide together. We originally started doing this 20 years ago because we found ourselves throwing out perfectly good strongbacks because they didn't meet the needs of our next project. So by building the strongback in three sections, you can mix and combine different ends with different centers to come up with different sizes. They don't last forever this way but they can usually make it though 3 or 4 builds before they are ready for the scrap pile.
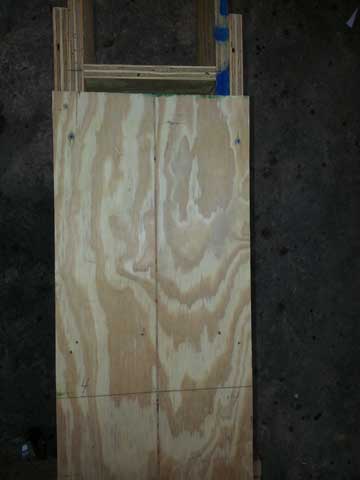
 Basically a box strongback is just that, a box. The one depicted here is two 8' sections with a box in the middle of them approximately 4' in length which allows us to slide the ends in and out until we get the desired length. Be sure you put cross members no less than every 18" to keep the box sturdy. You can see from the picture on the left where the end of the box meets the center piece. They are connected by setting 5 or 6 screws through the sides.
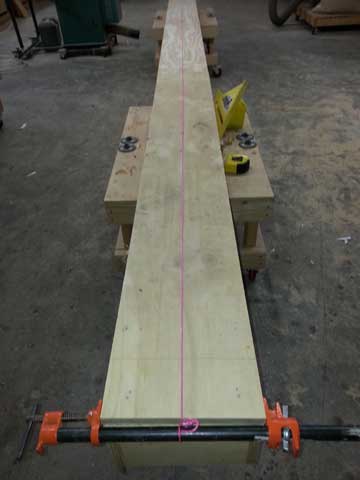
If you look closely at the top piece you can see a perfectly straight line down the center. The tops are just 3/4" plywood a couple of inches wider than your box underneath. In order to get the line, we put it on a table saw and run a thin kerf blade about 1/16" deep down the center. If you don't have a table saw, you can use a chalk line, but you will need to borrow someones saw to get the strongback built unless you order a kit from us. When we ship kits, we ship them in crates that can be used as a strongback. It takes us a bit longer to make them but customers have found it handy.
If you have the line cut down the center, you will need to align the different sections of the strongback so that it is straight from end to end. This picture shows a bright pink neon string down the center of the strongback. We attached one end with a clamp and the other to a screw at the distant end. Then all you need to do is pull the string tight slightly above the strongback top and align the boards so that the saw line is straight end to end.
Once the top is screwed down, you can mark off your form positions and get the forms ready for mounting. Before we do that here, we need to glue up our stem pieces. They have been out of the steamer and bent around the stem for a couple of days so they should be dry enough by now.
BENDING AND GLUING CANOE STEMS
There isn't much difference from a standard canoe stem and the freighters other than the size of them. So if you are using a pipe to steam you will likely need to have it able to sit on horizontal supports as it won't stand up vertically very well. A simple shelf should to the trick.
Each of our boat building DVD's covers steaming and steam sources, however for those of you who have not seen them, here is a quick recap.
STEAM SOURCE:
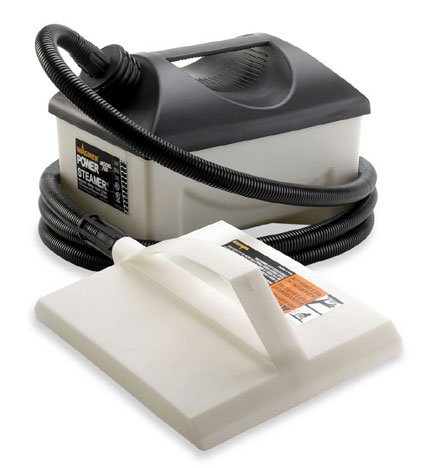 In the early days we showed people how to use an electric tea kettle and a piece of pipe to make a simple steamer. However in the last 15 or 20 years, electric tea kettles have become harder to find and when you do find them, they are not near as inexpensive as they used to be. As a very able substitute, you can easily find inexpensive wall paper steamers. In fact, they will hold more water and put out more steam so if you don't already have an electric tea kettle, then the wall paper steamer is the way to go. The Wagner model shown here is $50 at the local big box store. You will need to uncouple or cut the steam hose at the business end. Some models may make you cut it off others allow you to twist it off. Then you will need to devise a way to insert the end into a pipe or a simple steam box. This can be done with less than $10 worth of PVC couplings and a little duct tape. All you are looking to do is insert the hose into the steam chamber and capture the steam. There are other nuances that go into a steam chamber but that is for another article.
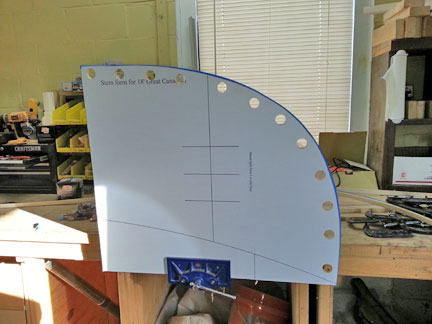 Cutting the freighter canoe stem form is no different from cutting any other body form. Simply glue the paper down and cut around the lines. In recent years we have been putting two sets of cutting lines on the stem forms. One set for a form yet to be cut for final height and another dotted line set shown the ultimate cut height for after the inner stem is mounted. We do this for those of you who are uncomfortable steaming and gluing both the inner and outer stem simultaneously. However if you are an old hand at it and comfortable doing so, you can go ahead and cut right to the final depth and take care of both at once. It is helpful to have another set of hands to hold the stem pieces in place while they are being bend around the form.
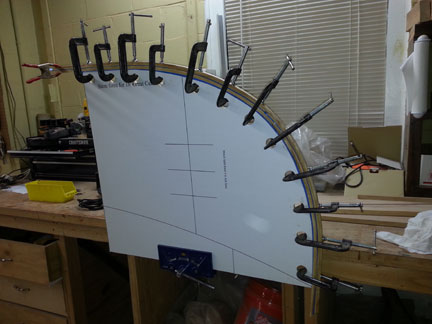 Before you can bend your stems about your form, you will need to make some holes to clamp them down during the bending and gluing phase. You will need either a Forstner bit or a paddle bit with about a 1" diameter depending on the size of your clamp ends. As you can see, I like to put a hole about every 5" to 6" Not so close so that it makes the form weak, but not so far away that you don't get a good representation of the shape when clamped. Be sure and have the outside of the hole at least 1 1/2" from the finished edge and don't go too close to the depicted waterline.
Steam bending is the same as the glue up, only without the glue, so I will skip right to the glue up. Personally I have glued up over a hundred set of canoe stems, so I glue up both the inner and outer stem simultaneously. Before you begin to glue, you need to tape up all the edges that you want to make sure don't get glued together. This means along the edge of the stem for sure and if like me you are gluing both the inner and outer stem at the same time you will need to have tape on the top edge of the inner freighter canoe stem as well.
It should be noted, that on this boat we will be putting a keel along the bottom of the boat per the customers request. We use the same method of doing this as we use for the Whitehall boats and show in the DVD. This will require you to steam up an extra length of stem piece, and put it aside until it is needed. So you will be steaming 5 pieces, however only gluing 4 (2 inner and 2 outer) stem pieces.
I think it is time to mount the skeleton of our freighter canoe to a strongback next.

